The Cold Steel of Winter Put Away by the Promise of Spring - Scabbard.
Description
The scabbard serves to store and carry a sword when not in use. It further serves to protect the blade from water and other oxidizers, as well as protect random objects from coming into contact with the sword’s edge. The leather extension at the mouth of the scabbard provides additional protection from the elements by coming up and over the base of the blade and forming a leather seal into which the blade of the sword passes when entering the scabbard.
This scabbard is based on surviving examples and artistic depictions from 13th - 14th century in western Europe, as well as modern reproductions which I found quite motivating. Examples of scabbards from this time period include the depiction on Sir Robert de Septvans’ funerary brass, the Scabbard of Saint Hadrian (Bamberg Scabbard), the Westminster Psalter, and the Christ Church MS 92 (De Nobilitatibus, Sapientiis, et Prudentiis Regum). For reference photos, please see the attached documents.

Supplies
Four pieces of wood or plywood (between 1/4 and 3/8 of an inch think)
2 pieces - longer than the blade of the sword, and a bit broader (preferably by at least 1/2 inch or so in both dimensions)
1 Base board
1 Top board
2 pieces -at least 1 inch wide, and long enough to run most of, if not the entire edge of the sword’s blade (if they are short by an inch or so, that’s fine).
2 Side boards
Leather
Artificial sinew
Wood glue
Your preferred dye or paint
Acrylic seal
Brass sheet
Two-part epoxy
Embroidery thread
Duct tape
Tools
Saw (hand saw and/or jig saw)
Dremel tool (with bits to cut metal and sand wood)
Sandpaper
250 grit, 800 grit, 2,000 grit, 5,000 grit, 7,000 grit, and 10,000 grit
Leather punch
Leather sewing needle
Permanent marker
Clamps
Paint brushes
Ballpein hammer
Dishing form
Stout scissors
Sharp knife
Plyers
Tin-snips or equivalent
Safety goggles
Leather work gloves
Construction
Part 1: Woodwork
First of all, be careful when working with tools - especially sharp blades and power tools. If it can cut leather, wood, and metal, it can cut you. I know this from experience. Wear safety goggles. Wear work gloves. Be safe.
Begin by placing the intended sword to be sheathed on the base board. Take the permanent marker and trace the blade of the sword on the base board. The sword should then be removed and placed somewhere safe but close at hand.
Take the two side boards and line them up with the tracing of the sword’s blade. If they are the appropriate length (roughly the length of the blade edge), apply glue to one side each of the two side boards. Then press the glued side against the base board along the outside of the traced line of the base board. Apply clamps to hold the side boards to the base board. If the clamps are not long enough, apply weight on top of the side boards pressing onto the baseboard. I recommend free weights or particularly academic books. Leave in place for 24 hours or however long the glue’s instructions indicate is necessary to fully cure.
Once this time has run, pass the sword into the opening that will form the resting place of the blade in the scabbard. Any irregularities that prevent the sword for moving cleanly through the channel (slinters, glue bulges, etc.) should be removed at this time. Once this is done, mark at least ¼ of an inch out from the channel on the two side boards. Make a line at this distance that runs the length of the blade on both side pieces. These will be your cut lines.
Carefully cut away the extra wood along the lines you just marked. Then take the top board and place it on top of the wooden channel you made. Hold the top board against the wooden channel and then slide the sword into the opening. If it seems to pass in and out unobstructed, the it is ready for gluing.
Apply glue to the top on the side boards and spread it evenly (removing excess) with a paintbrush. Then place the top board on the glued sideboards. Clamp the boards and wait for the glue to harden. Again, if the clamps won’t work for some reason, seek out those other heavy objects to pile on top of your project.
Once the glue is dry, cut away the excess of the top board that hangs over the rest of the scabbard. That’s right, once you finish those cuts you now have a scabbard! A blocky and bare scabbard, but a scabbard none the less.
Prepare for sanding! For the sake of sanity, I recommend using a belt sander to round off the corners of your scabbard. However, I can verify (from this project) that a dremil tool with some 250 grit sandpaper to finish will also work (albeit, it will take a lot more time, but we all make do with what we have). It is theoretically possible to use only sandpaper or a file to take the corners off the scabbard. For the sake of time, I would not recommend it. When you are done, the scabbard should have a reasonably uniform and oval profile, allowing you to comfortably hold it in your hand.

Part II: Leatherwork
Take your leather and lay it out. Place your scabbard on the leather and position it in such a way to ensure the leather will run the full length of the scabbard and can eventually completely envelope it (make sure to have an additional inch or two of leather going out past the opening of the scabbard if you want to have a rain-guard). Remove your scabbard and fetch your glue. Apply glue to one of the flat faces of the scabbard and place it back onto the leather. You can use a knife to score the leather and the scabbard before placement to ensure the glue holds.
DO NOT COMPLETELY COAT THE SCABBARD IN GLUE!
This will go in stages to ensure a tight fit.
Once again, apply heavy objects on top of the scabbard and grab a snack. Once the glue is dry, remove the weights and prepare for the next stage. Apply glue to one side of the scabbard and pull the leather tightly over the side. Apply claps to hold the leather until it is dry. Repeat this process for the other side. If you don’t have enough clamps, you can work your way down the sides of the scabbard in sections.
At this stage you can probably apply clamps to the leather to close up the back and cut away most of the excess leather. You can also take the time to use the leather punch to punch holes running along the sides of the leather on what will be the back of the scabbard. Then you can use artificial sinew to tightly stitch up the back of the scabbard. In hindsight, I wish I had done this.
What I did was apply glue to the back of the wood core of the scabbard, stretch the leather over it, and clamp the leather in place after cutting away most of the excess. Afterwards, I fought with the leather punch to get it close enough to the scabbard to get the holes properly placed for the stitching. This also works, but is needlessly frustrating.
After the leather is on, look to the mouth of the scabbard. If you are adding a rain-guard, cut away the sides of the leather extending past the mouth, leaving a V-shape or a rounded extension on the face and back of the scabbard. This should go over the crossgaurd of the sword. Push the opening onto your leather, with the extensions splayed outwards. Trace this shape and cut it out. Carefully apply glue to the sides of the wooden opening of the scabbard that should still be visible at the mouth. Press the piece of leather you cut into the opening, and clamp it in place by the extensions. This should have closed off the scabbard opening. Once the glue has dried, take a sharp knife and cut an opening into this leather at the mouth of the scabbard a little smaller than the breadth of your blade. The sword should fit neatly into the scabbard. If it does, you’re ready for final decoration.

Part III: Decoration
If you were looking to tool the leather, it is probably too late. However, dying and painting is still an option. Apply your dye to the scabbard in thin, even coats. Try not to stop mid application to avoid color inconsistencies. Also, be sure to test your dye on a scrap piece of leather first to make sure the leather you are using will absorb your dye. If you don’t then, like me, you will learn too late and have a gigantic mess on your hands and a scabbard that is only vaguely the right color. If you are in such a situation, or learned in advance that the leather you are using has already been treated and resists further attempts at dying, then paint will work. Again, apply the paint in thin even coats until you have achieved the desired effect.
Once the base color is done, you can apply the details. I used green for the base color of my scabbard. As my heraldic colors are green, gold, and white, I decided the details should be gold and white. The flowery vines running up my scabbard (white ivy with gold flowers) is inspired by depictions of ivy I have seen in manuscripts from roughly the same time period as this style of scabbard. I recommend a brush with a fine tip, such as one that is used for painting miniatures.
Near the mother of the scabbard, I also painted my heraldry. Near the bottom I added a gold chalice, a common feature in my heraldry, and made it seem the as if the flowers were growing out of the chalice. To protect the paint, after it dried, I applied an acrylic seal.
Punch holes near the top edge of the rain-guard. Take the embroidery floss and begin stitching the outer leather and the leather mouth of the scabbard together. This will serve to help further secure the two pieces of leather to each other, as well as provide additional decoration. I used white to fit the heraldic theme.

Finally, there is the chape…
Step IV: Metalwork
Side note - Dear reader, you may have noticed I switched from an instructional tone to first-person in this passage. That is because I cannot, in good conscience, recommend anything that I did here. I felt like I was basically making it up the entire time, guided only by what I thought made sense in the moment and what I could reasonably achieve with the resources I had at hand. I already have at least two better ideas for how to make a chape, and will probably not repeat this method in the future (at least not without better tools). However, this is an honest account of how I made this one.
The chape is a small piece of metal that cups the bottom of the scabbard. I began by measuring the scabbard’s bottom to ensure it would roughly be the right fit. I then measured and used the dremil tool to cut a general shape out of a piece of sheet brass. Using the dremil tool and some metal cutters, I then ground and cut the piece further until it was a flattened shape of what I wanted. For much of this process, I held the brass with plyers as the metal became exceptionally hot. Brass dust and shards were a common feature.
After this, I took the chape to a dishing form. First a smaller one to get the deeper cupping necessary for the middle and the top sides. I shaped it as best I could with a ball pein hammer, before taking it to the larger dish to add a general curve. I believe I used 16 gauge, but in hindsight I would probably recommend 18 or 20, as it is easier to shape and the additional strength is not needed. After cutting small openings near the middle of the chape to aid the shaping process, I continued curving it. I checked its shape compared to the scabbard tip. After several rounds of alterations and checking, the it was finally a reasonable fit.
I applied a two-part epoxy to the inside the chape and secured it to the end of the scabbard. It did not stay in place easily, so I had to tape it while it dried. The paint was slightly damaged in the process, but it was easily repaired.
The chape had quite a bit of scarring let after the shaping process. To buff out the marks, I began with 800 grit sandpaper, then proceeded to 2,000 grit, 5,000 grit, 7,000 grit, and finally 10,000 grit.

Step 5: Conclusion
At the end of this process, you should have a scabbard roughly like the one I made. Thank you for your time.
Alexander of Ayr
Thanks
To Master Morien MacBain, for inspiring me and for your unending support
To Otto Boese of House Sable Maul, your class on scabbard making five years ago motivated me to give this a shot (though I confess, I probably misremembered half of what you taught).
References

Source: Sir Robert de Septvans’ funerary brass
Date: 1306
Location: Saint Mary’s Church, Chartham, UK
Weblink: https://www.stmaryschartham.org/Groups/346671/
The_Church_Building.aspx
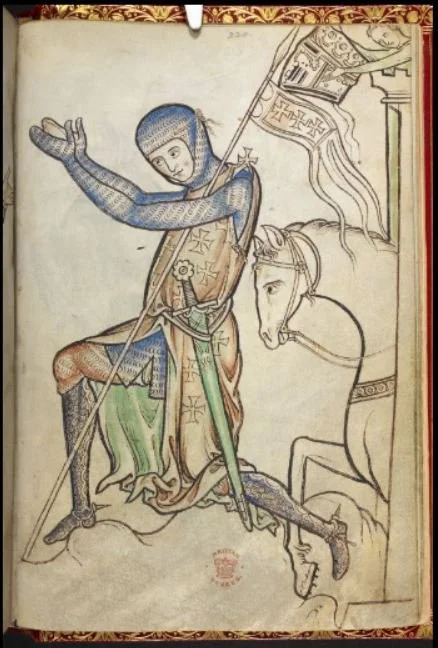
Source: Westminster Psalter, folio 220
Date: 1200-1250
Location: British Library, London, UK
Weblink: http://www.bl.uk/manuscripts/
Viewer.aspx?ref=royal
_ms_2_a_xxii_f220r

Source: Christ Church MS 92 De Nobilitatibus, Sapientiis, et Prudentiis Regum, Folio 67r-5
Date: 1326-1327
Location: London, UK

Source: Christ Church MS 92 De Nobilitatibus, Sapientiis, et Prudentiis Regum, Folio 3
Date: 1326-1327
Location: London, UK