By My Pretty Floral Shield, I Will End You.
Shield of the Scottish Guard of France
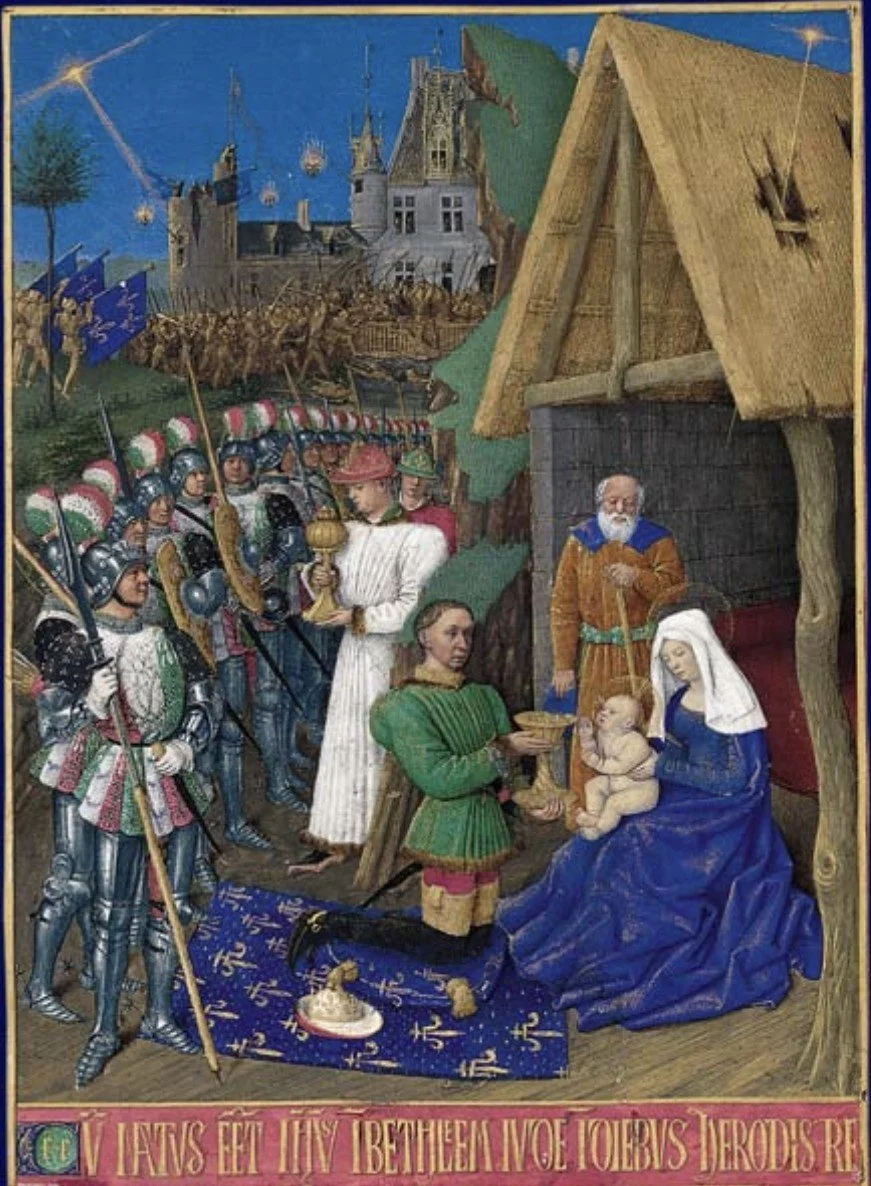
Adoration of the Magi, Jean Fouquet (Mid-15th Century).
(https://essentiels.bnf.fr/fr/image/66b370f8-c3c0-47e7-8574-f59900b47c66-adoration-mages)
Introduction
In the wake of Agincourt, thousands of Scottish troops arrived in France to join the French cause. These forces, possibly the largest medieval army Scotland ever deployed abroad, are remembered as the La Grande Armée Écossaise. The majority of these soldiers were something France was sorely lacking against the English – archers. The future King Charles VII of France chose a select few of this expeditionary force to serve as his personal guard, and richly equipped them. This unit, remembered as the Scottish Guard, would go on to serve in the French army for years against the English in the Hundred Years War.
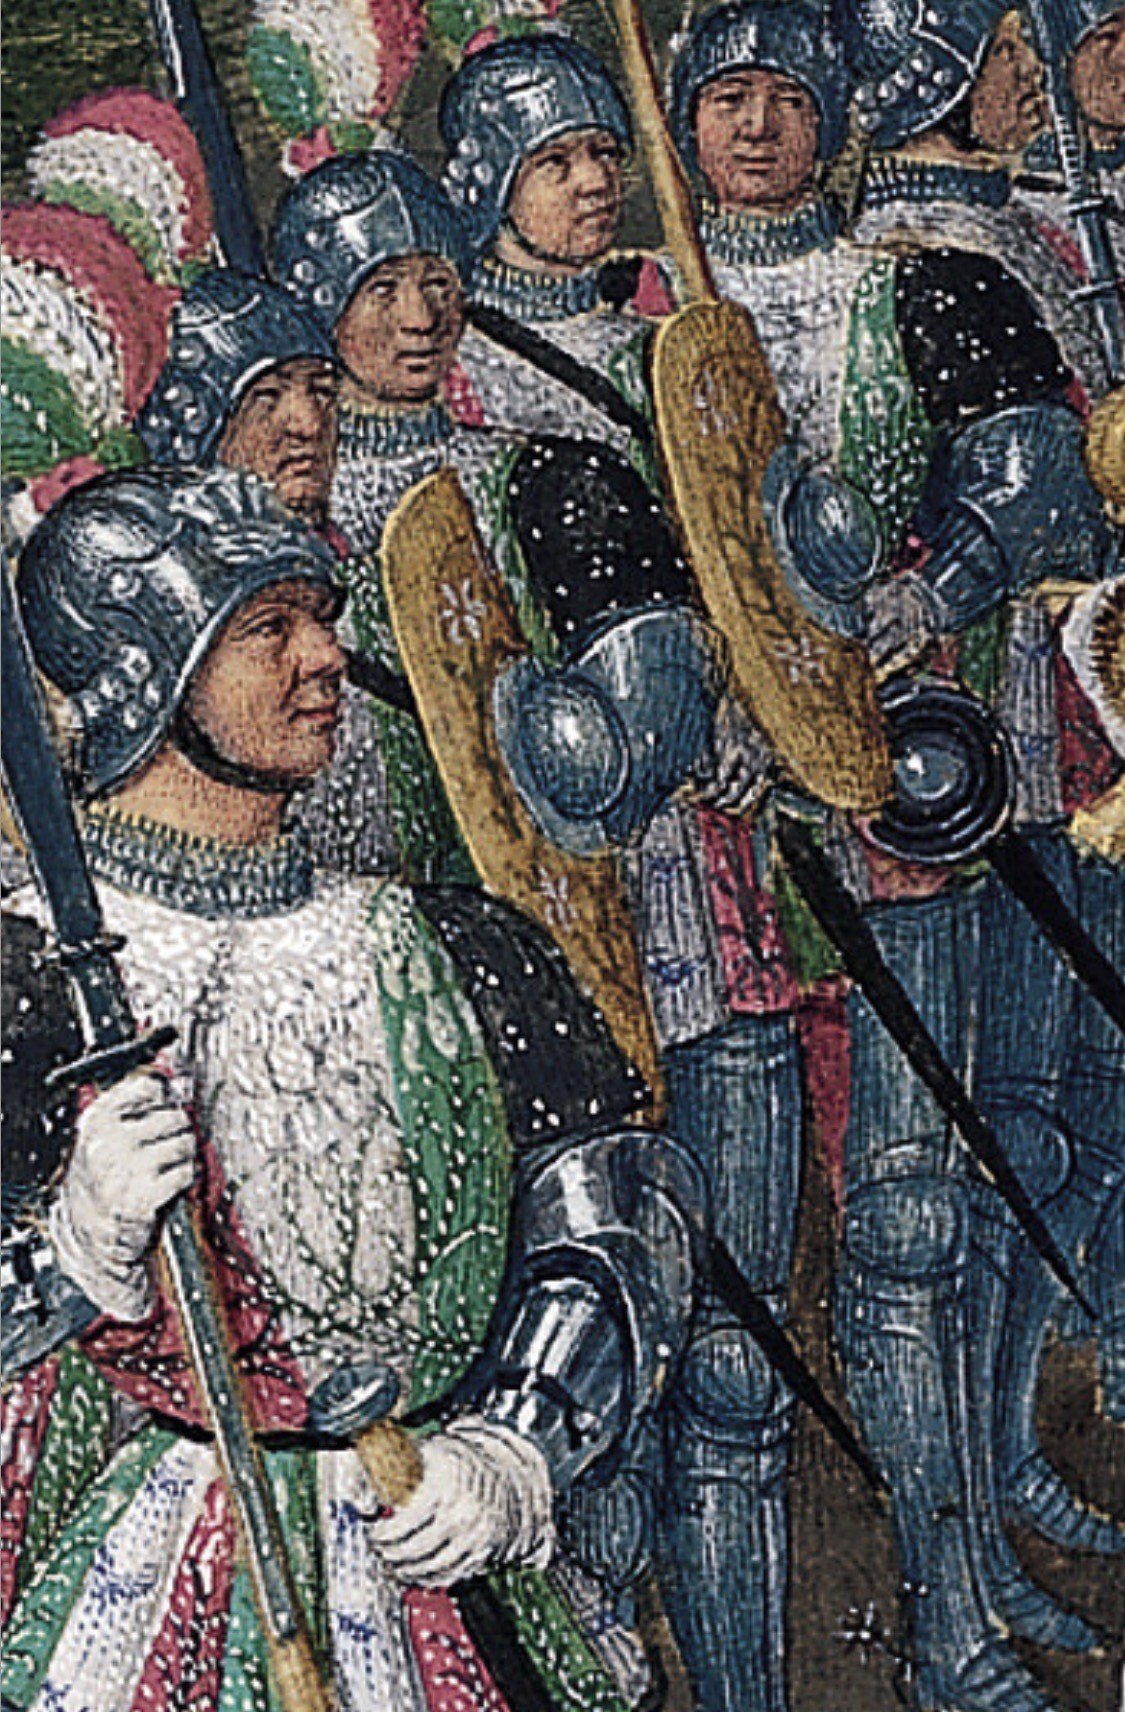
The Scottish Guard are portrayed in this mid-15th century painting above. This painting is called The Adoration of the Magi and is attributed to Jean Fouquet. The painting portrays one of the Magi, modeled off of King Charles VII of France, kneeling before Jesus. Behind the Magi/Charles are over a dozen members of the Scottish Guard, as marked out by their particular livery.
Adoration of the Magi, Jean Fouquet (Mid-15th Century).
(https://essentiels.bnf.fr/fr/image/66b370f8-c3c0-47e7-8574-f59900b47c66-adoration-mages)
The archers are particularly well armored, and equipped with glaives, swords, bucklers and bows. However; what caught my eye are the shields. These shields seem unique for 15th century western European shields. The shields have a large metal boss, so presumably they are held by a center-grip. However, they are too big to be bucklers, and they appear to be supported with a guige strap (shoulder strap). The shields appear to be large enough to cover most of the torso, likely because the extensive body armor made a larger shield unnecessary and because the Guard’s primary weapon was a bow. The shields’ shape is also distinctive. They are not shaped like other shields of the period that I have seen before (pavises, heater shields, ecronches, etc.). Instead, they are curved (or concave), and, based on the painting, the shields have rounded edges with flatter sides. As a result, the shields were likely either rectangular or a squarish-ovals.
The livery the Scottish Guard seen in Adoration of the Magi seems to match other descriptions that I could find, so it seems unlikely that the shields are an artistic invention. However, I have not seen any surviving examples of shields from the period that share the characteristics of those shown with the Scottish Guard. I have a theory about how they were intended to be used, but without an example to work with I can’t test them. However… I can do something about this - I can make a protype!
Prep-Work
I did some poking around to try to determine the period ways of making a 14th-15th century shield. Der Mittelalterliche Reiterschild (The Medieval Knight’s (or horseman’s) Shield) by Jan Kohlmorgen was quiet helpful, even if it doesn’t have an English translation. This book reviewed several surviving examples of medieval European shields, and carefully detailed their measurements and methods of construction.
Generally speaking, most medieval shields by the 14th century were of a plank construction, with boards of wood glued together, rather than a single piece of wood. The boards were bent and glued together on a shield press to achieve a curve. The boards where then cut into shape, and covered. Textile coverings were common, with layers of linen being used in combination with gesso being applied to the front and the back. Shields were also sometimes edged with leather or rawhide, but this does not seem to be universal. The fronts of shields could also be covered with some kind of animal skin (parchment, leather, or rawhide) which would help hold the planks together and strengthen the shield. However, this added weight, and several surviving shields seem to have forgone this step. (I suspect that when writers state that the shields are covered in parchment, they do not mean fully prepared writing parchment, but a similar kind of animal skin that has not gone through the tanning process).
I could not find a surviving example of a Scottish Guard shield, so I cannot definitively conclude how they were made. However, based on some commonalties from other later 14th-15th century shields, I can make a couple of educated guesses about the materials and tools I would need to make my prototype
Supplies:
Planks of poplar wood (between 10-15 mm thick (about ½ an inch))
Wood Glue
Gesso and paint
Rawhide
Tacks
Leather (4mm and 0.8 mm)
Canvas dropcloth
Shield boss
Nails (about 2 inches long)
Stainless steel washers
A wooden dowl (poplar) about 1.5 inches thick
Steel wool
Vinegar
A buckle
A sled (optional)
Tools:
Shield Press
Ratchet straps
Sandpaper
Ballpeen hammer
Jig-saw
Power drill
Dremil tool
Mason jar (with lid)
Several paint brushes
Anvil
Scissors (and probably tin snips)
A leather strap cutter (not necessary, but recommended)
Every clamp you can find (and strips of wood or leather)
The Core
The planks of the shield are all half an inch thick. This seems to be roughly typical for the period, as several surviving examples tend to be between 10 and 15 mm thick. (Jan Kohlmorgen, Der Mittelalterliche Reiterschild (Karfunkel Verlag, 2002), 127-129). The planks are made of poplar, which is also correct for the period. (There are surviving examples of poplar shields from the 14th-15th centuries, such as the Black Prince’s Shield at Canterbury Cathedral (Jan Kohlmorgen, Der Mittelalterliche Reiterschild (Karfunkel Verlag, 2002), 110-113); however, I have been told that North American poplar is distinct from European poplar. As a result, there may be some different properties between the two woods when it comes to shield construction. However, poplar from Home Depot is what I had access to, so I used what I could.) Most of the surviving shield examples I could find used a softwood (e.g. linden wood or poplar) rather than a hardwood (e.g. oak or ash), likely to reduce weight and with the understanding that shields were going to be somewhat disposable.
I soaked the planks in water using a sled to try to make the bending process easier (with mixed results).
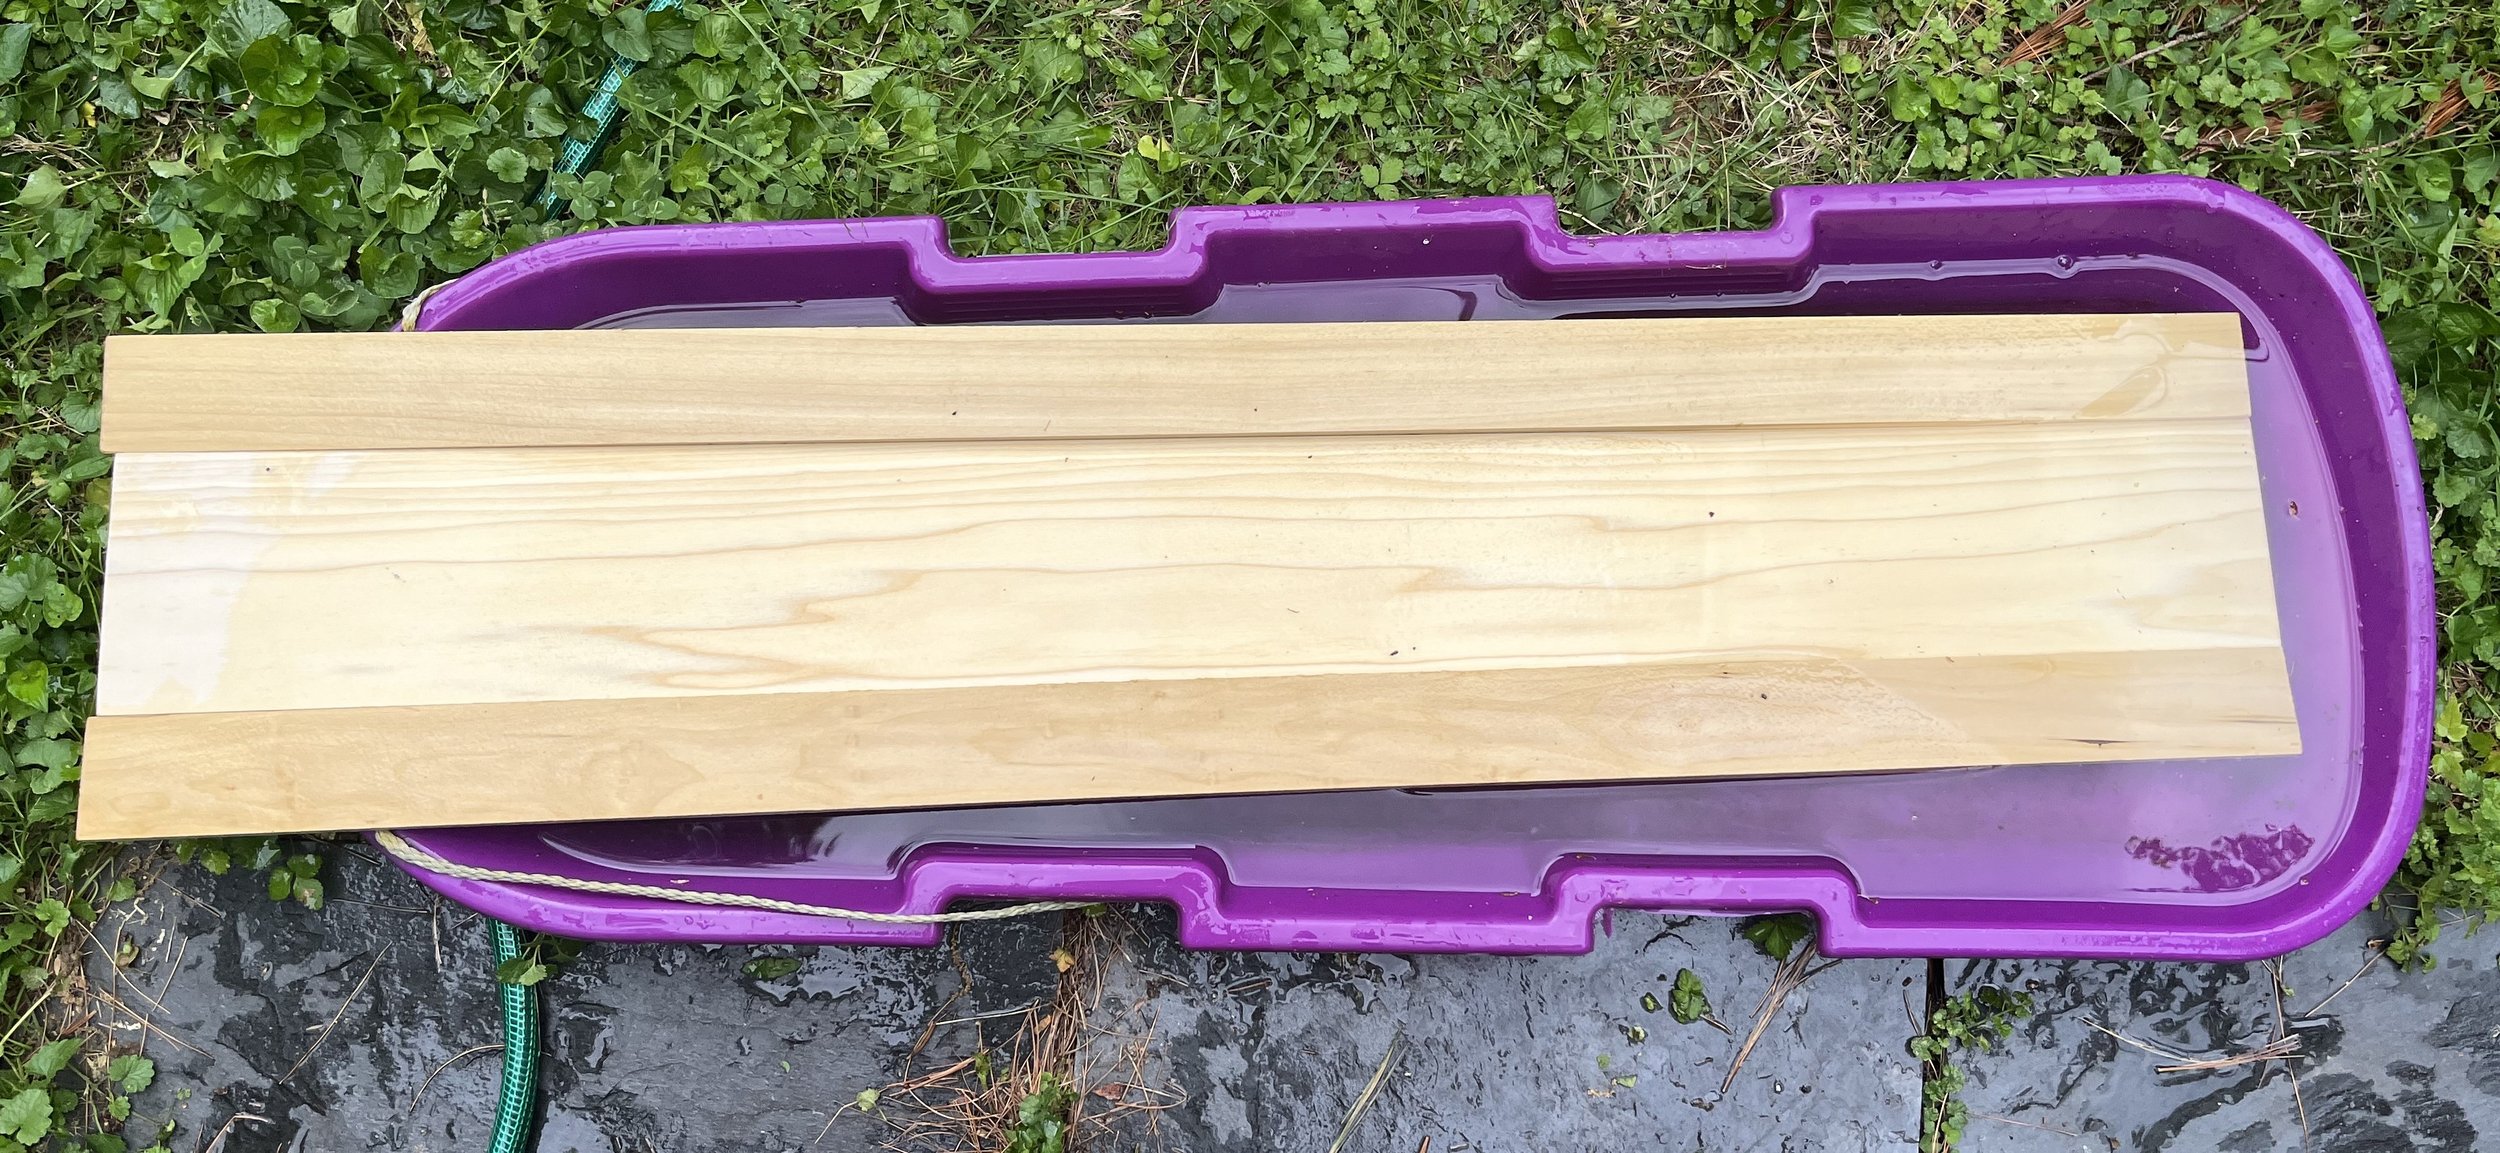
Pictured above - Science!
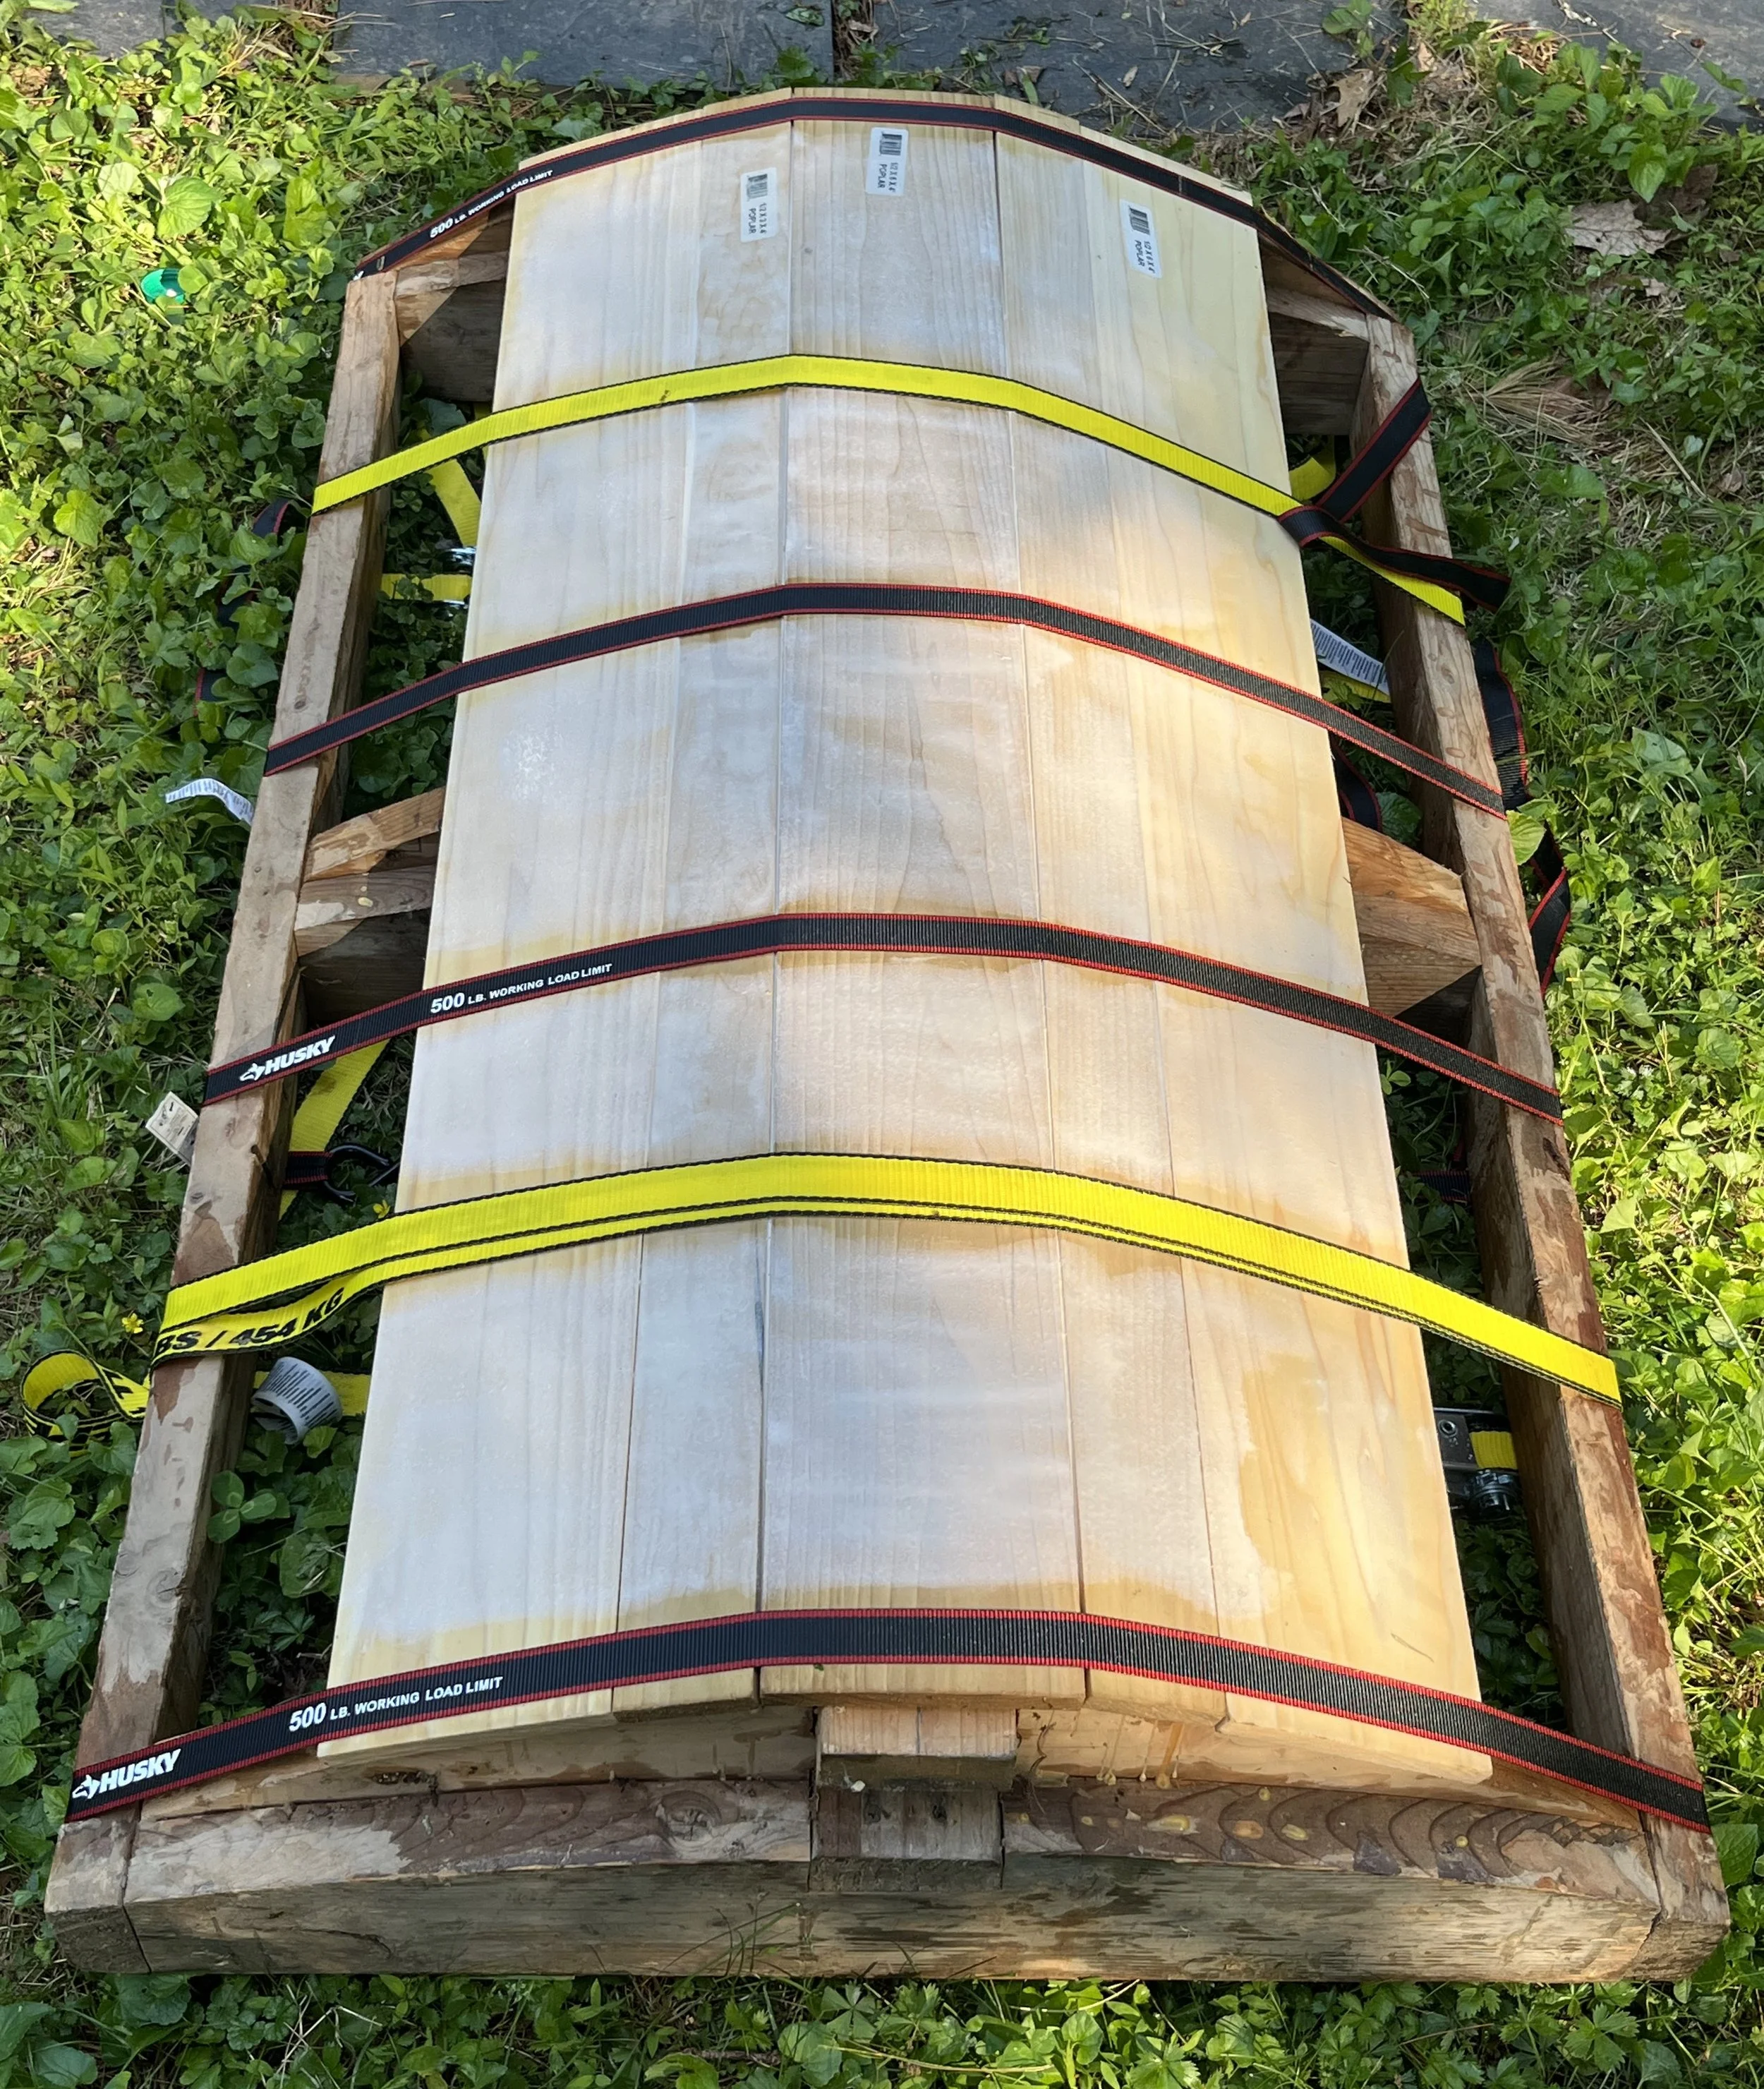
After the boards had soaked for a while, I fitted the boards onto the press and retched them down. I then applied glue to the boards, allowing it to fill any gaps, and left the amalgamation to set. Glue was repeatedly applied over time until any crevices had been thoroughly glued together.
Once the glue set, I removed the ratchet straps. The wood was springier than I expected, flexing slightly under pressure, but returning to shape. Hopefully this indicates a shock absorption aspect of the construction, and not that it will imminently break under serious impact. Time will tell!
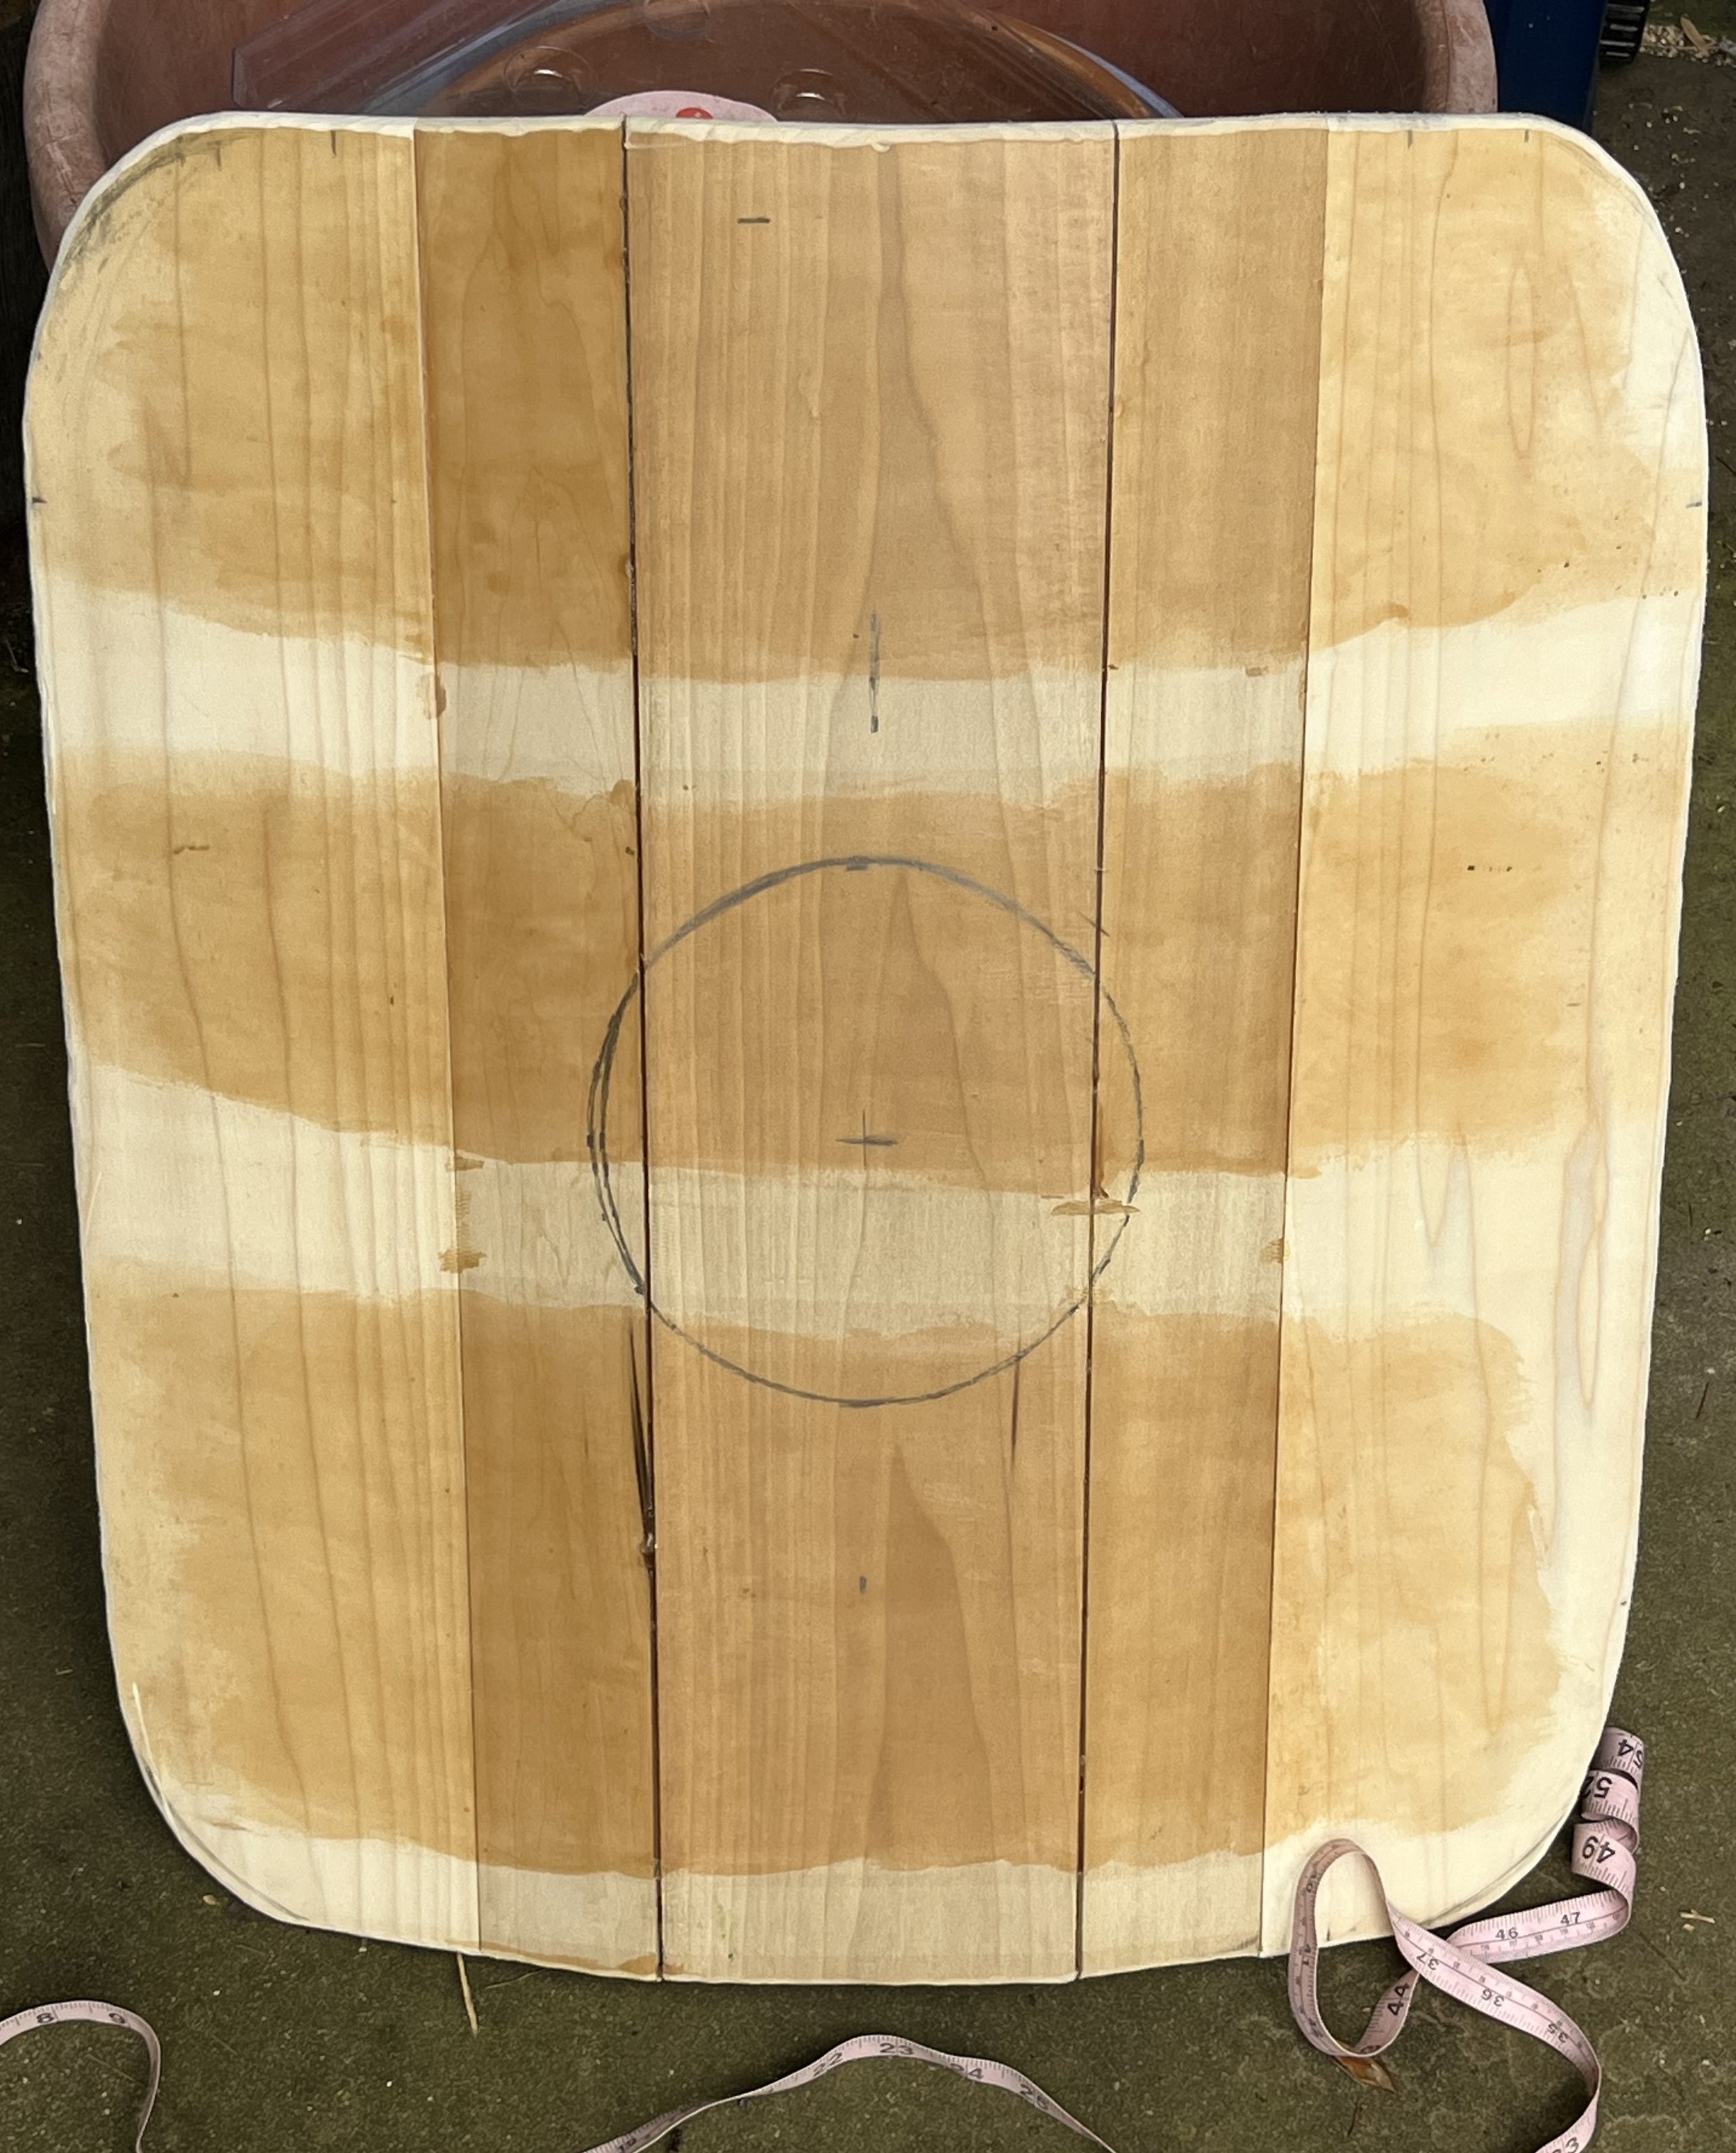
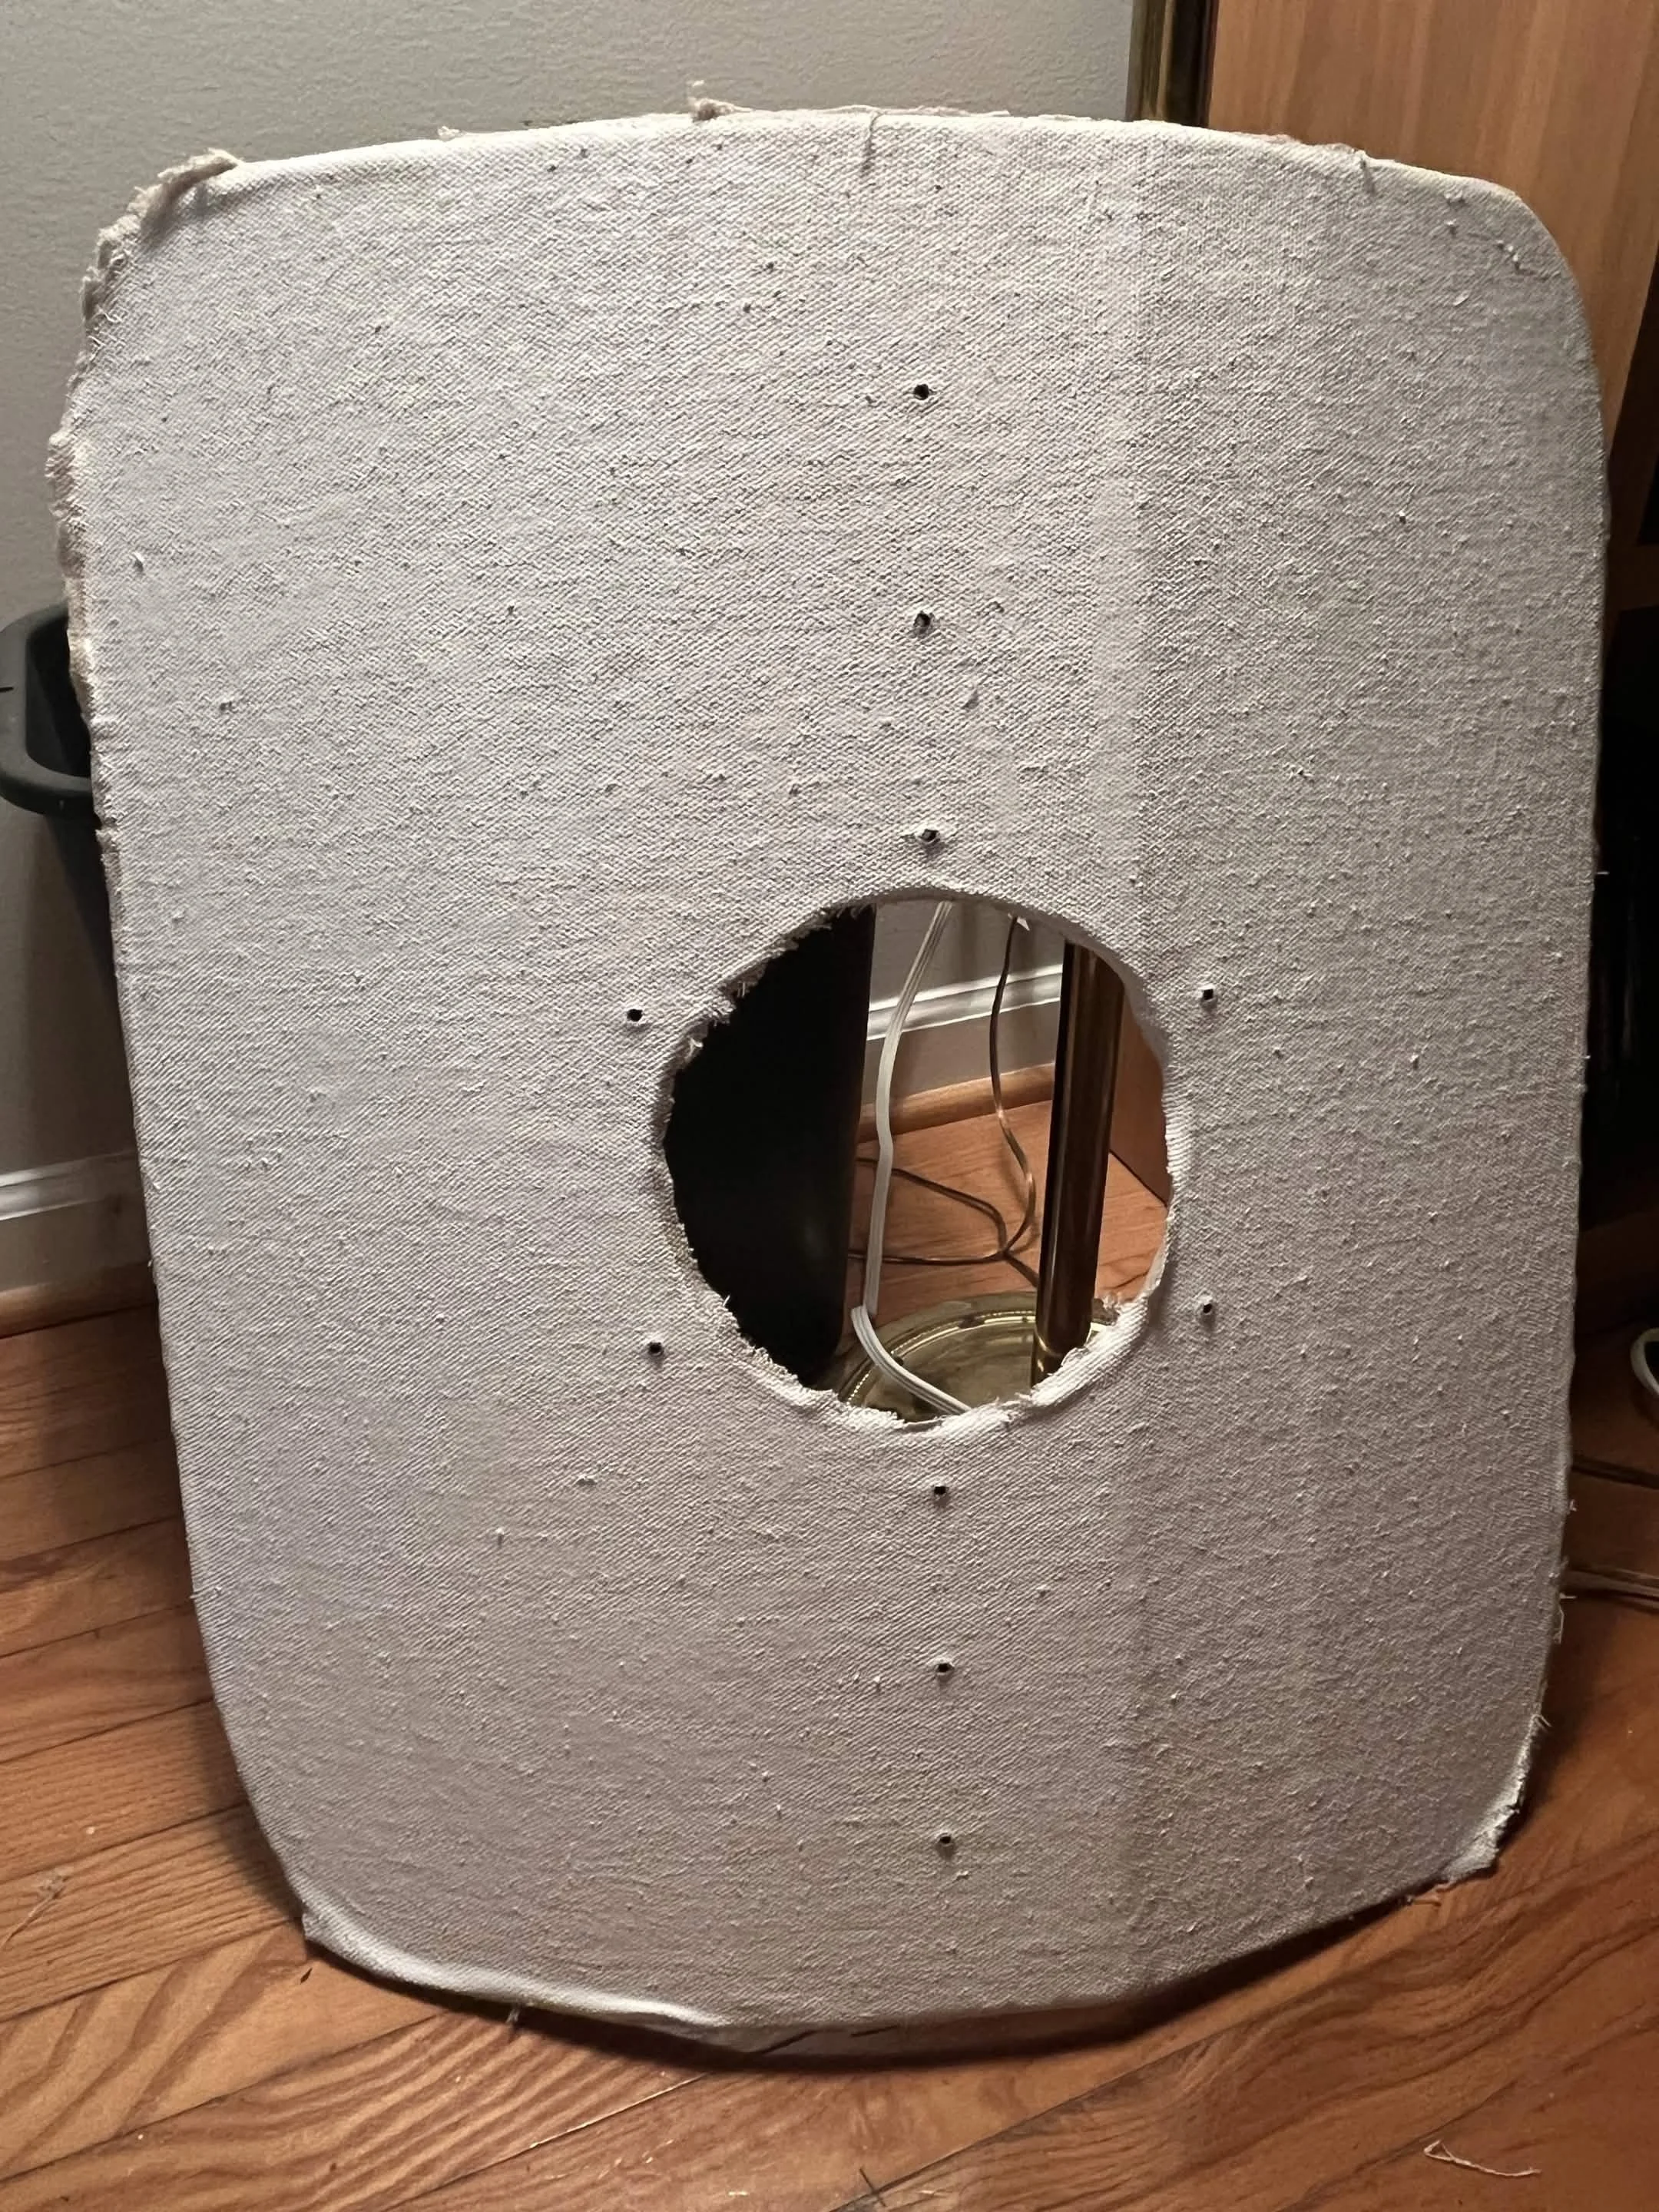
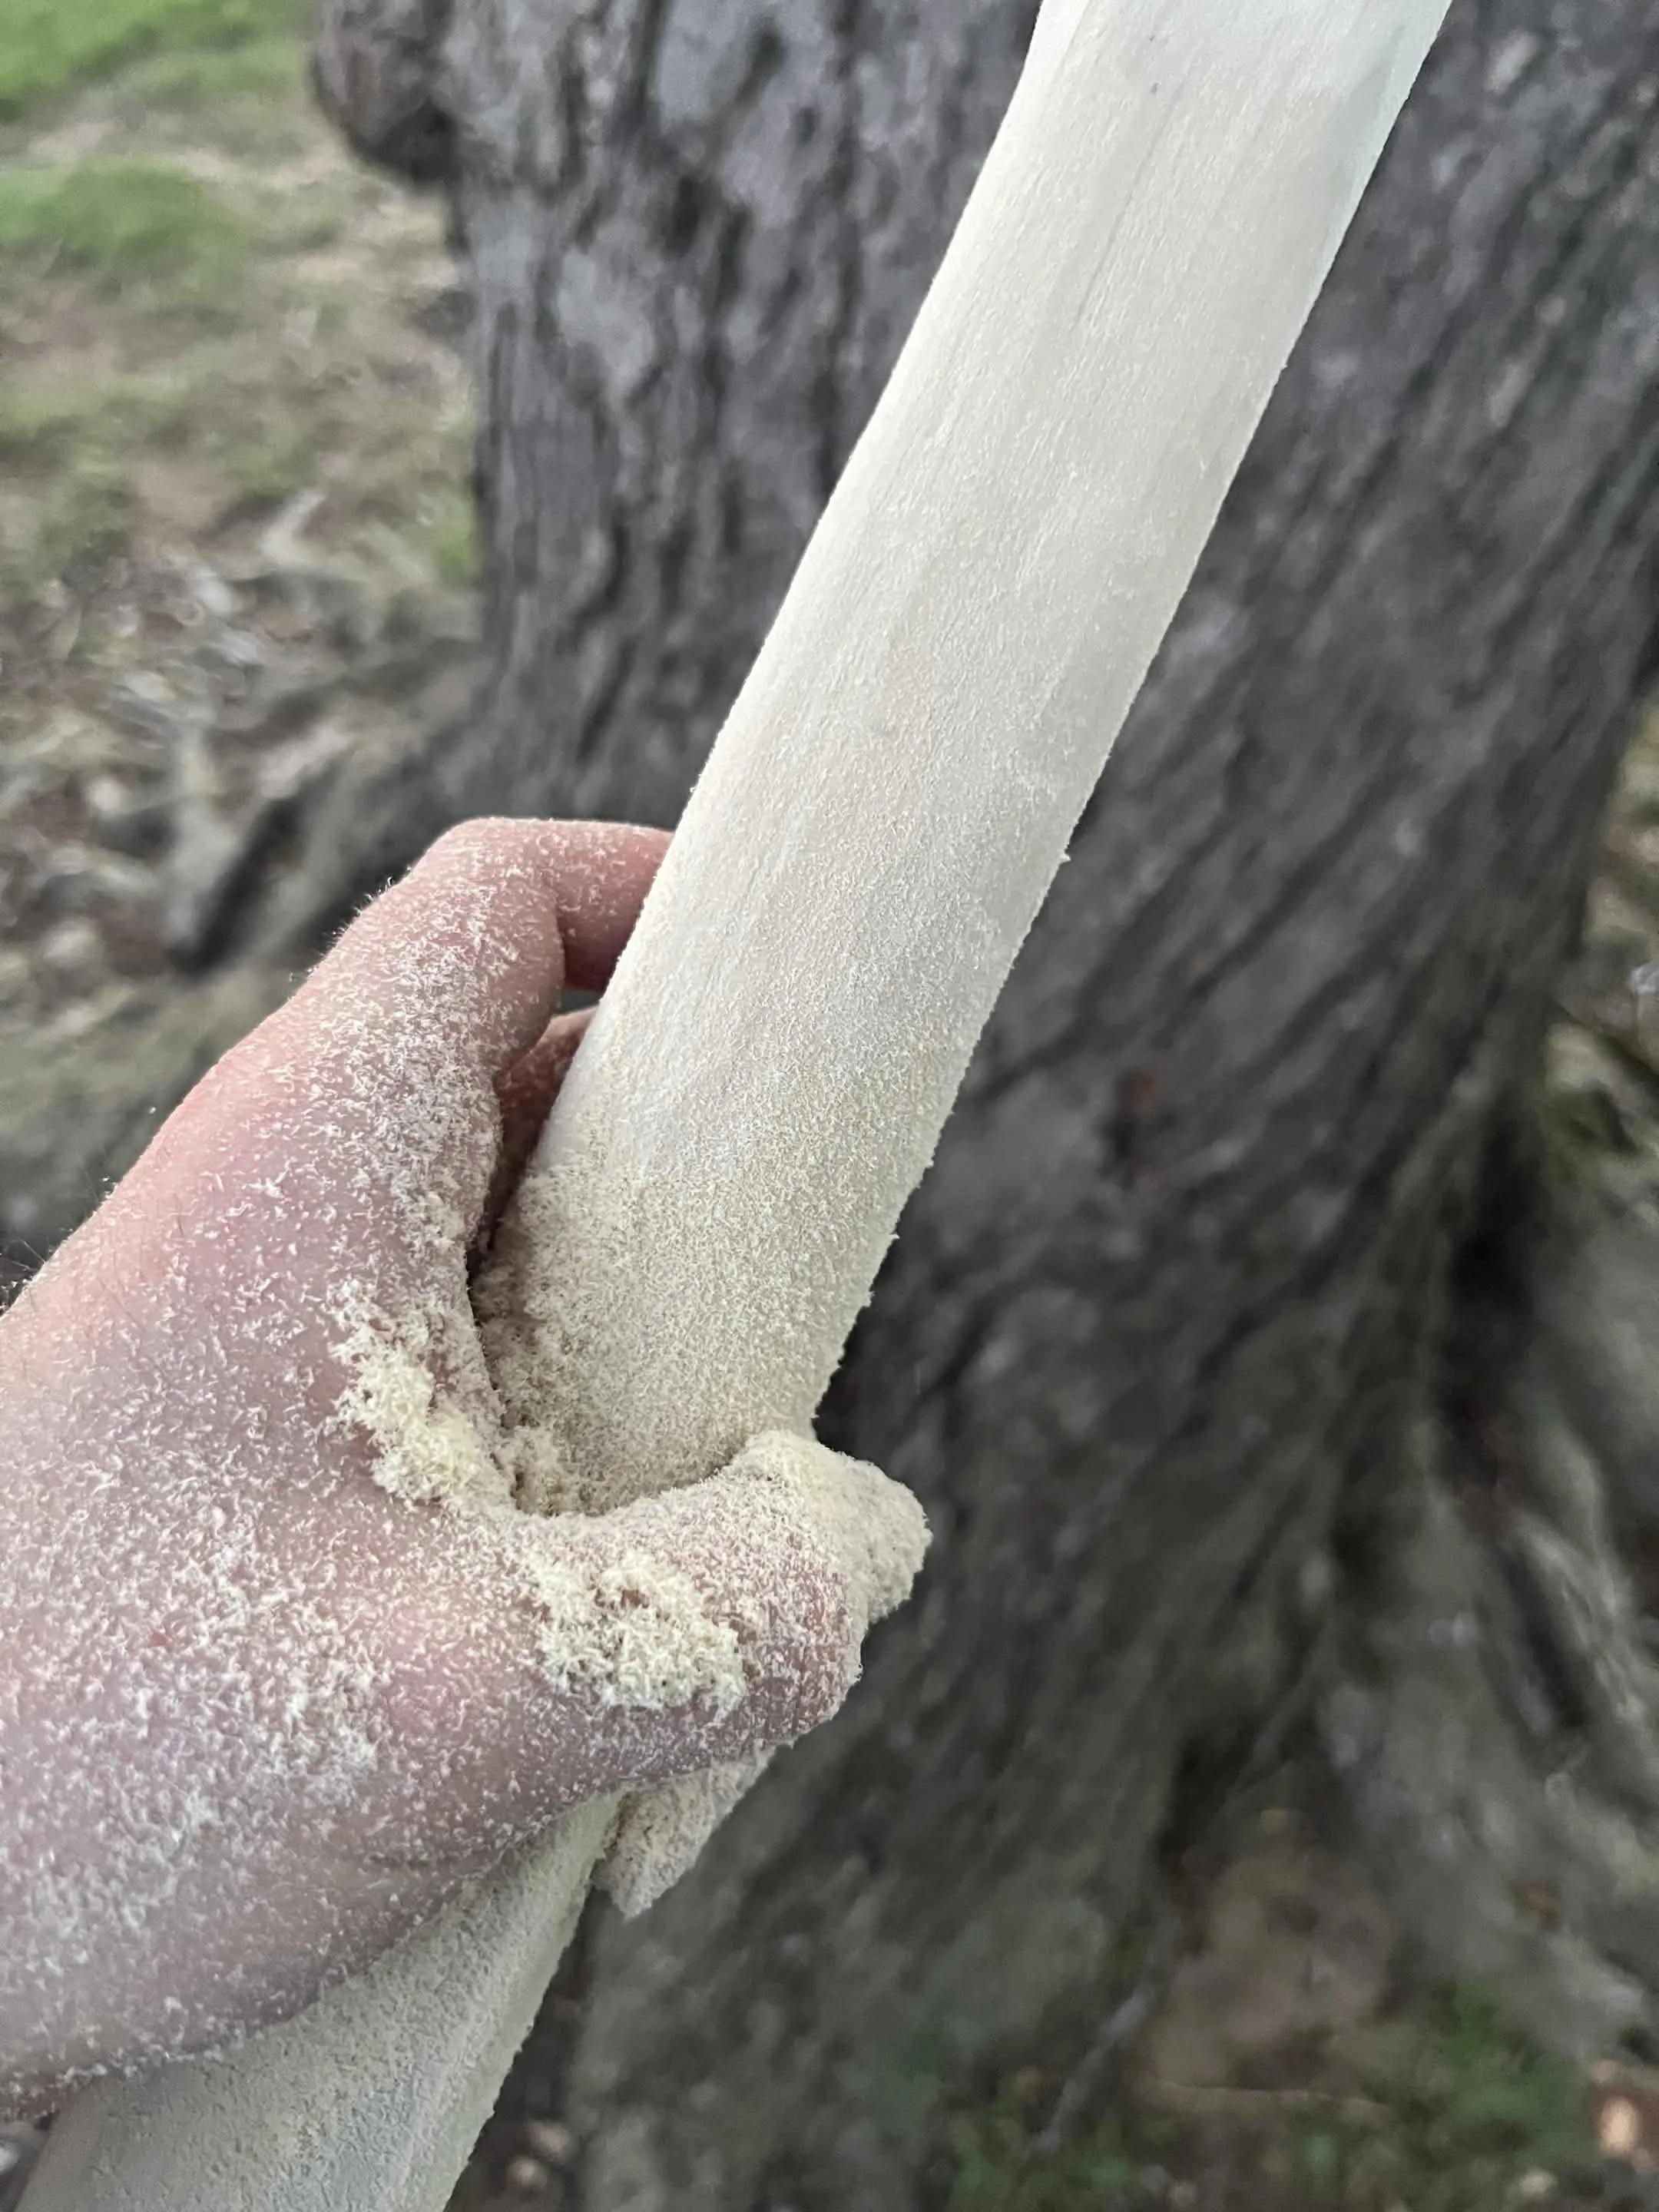
After I took the shield off the press, I cut it to shape. I was unable to find measurements for the shields used by the Scottish Guard before I began the project. Based on The Adoration of the Magi, the shields appear tall enough and wide enough to cover most of the torso, so I settled on an estimate of 24 inches long, and about 20 inches wide, with rounded edges and a roughly rectangular shape (in the future I may try a more oval variant). After the shield was generally the right shape, I beveled all of the edges with a Demil tool.
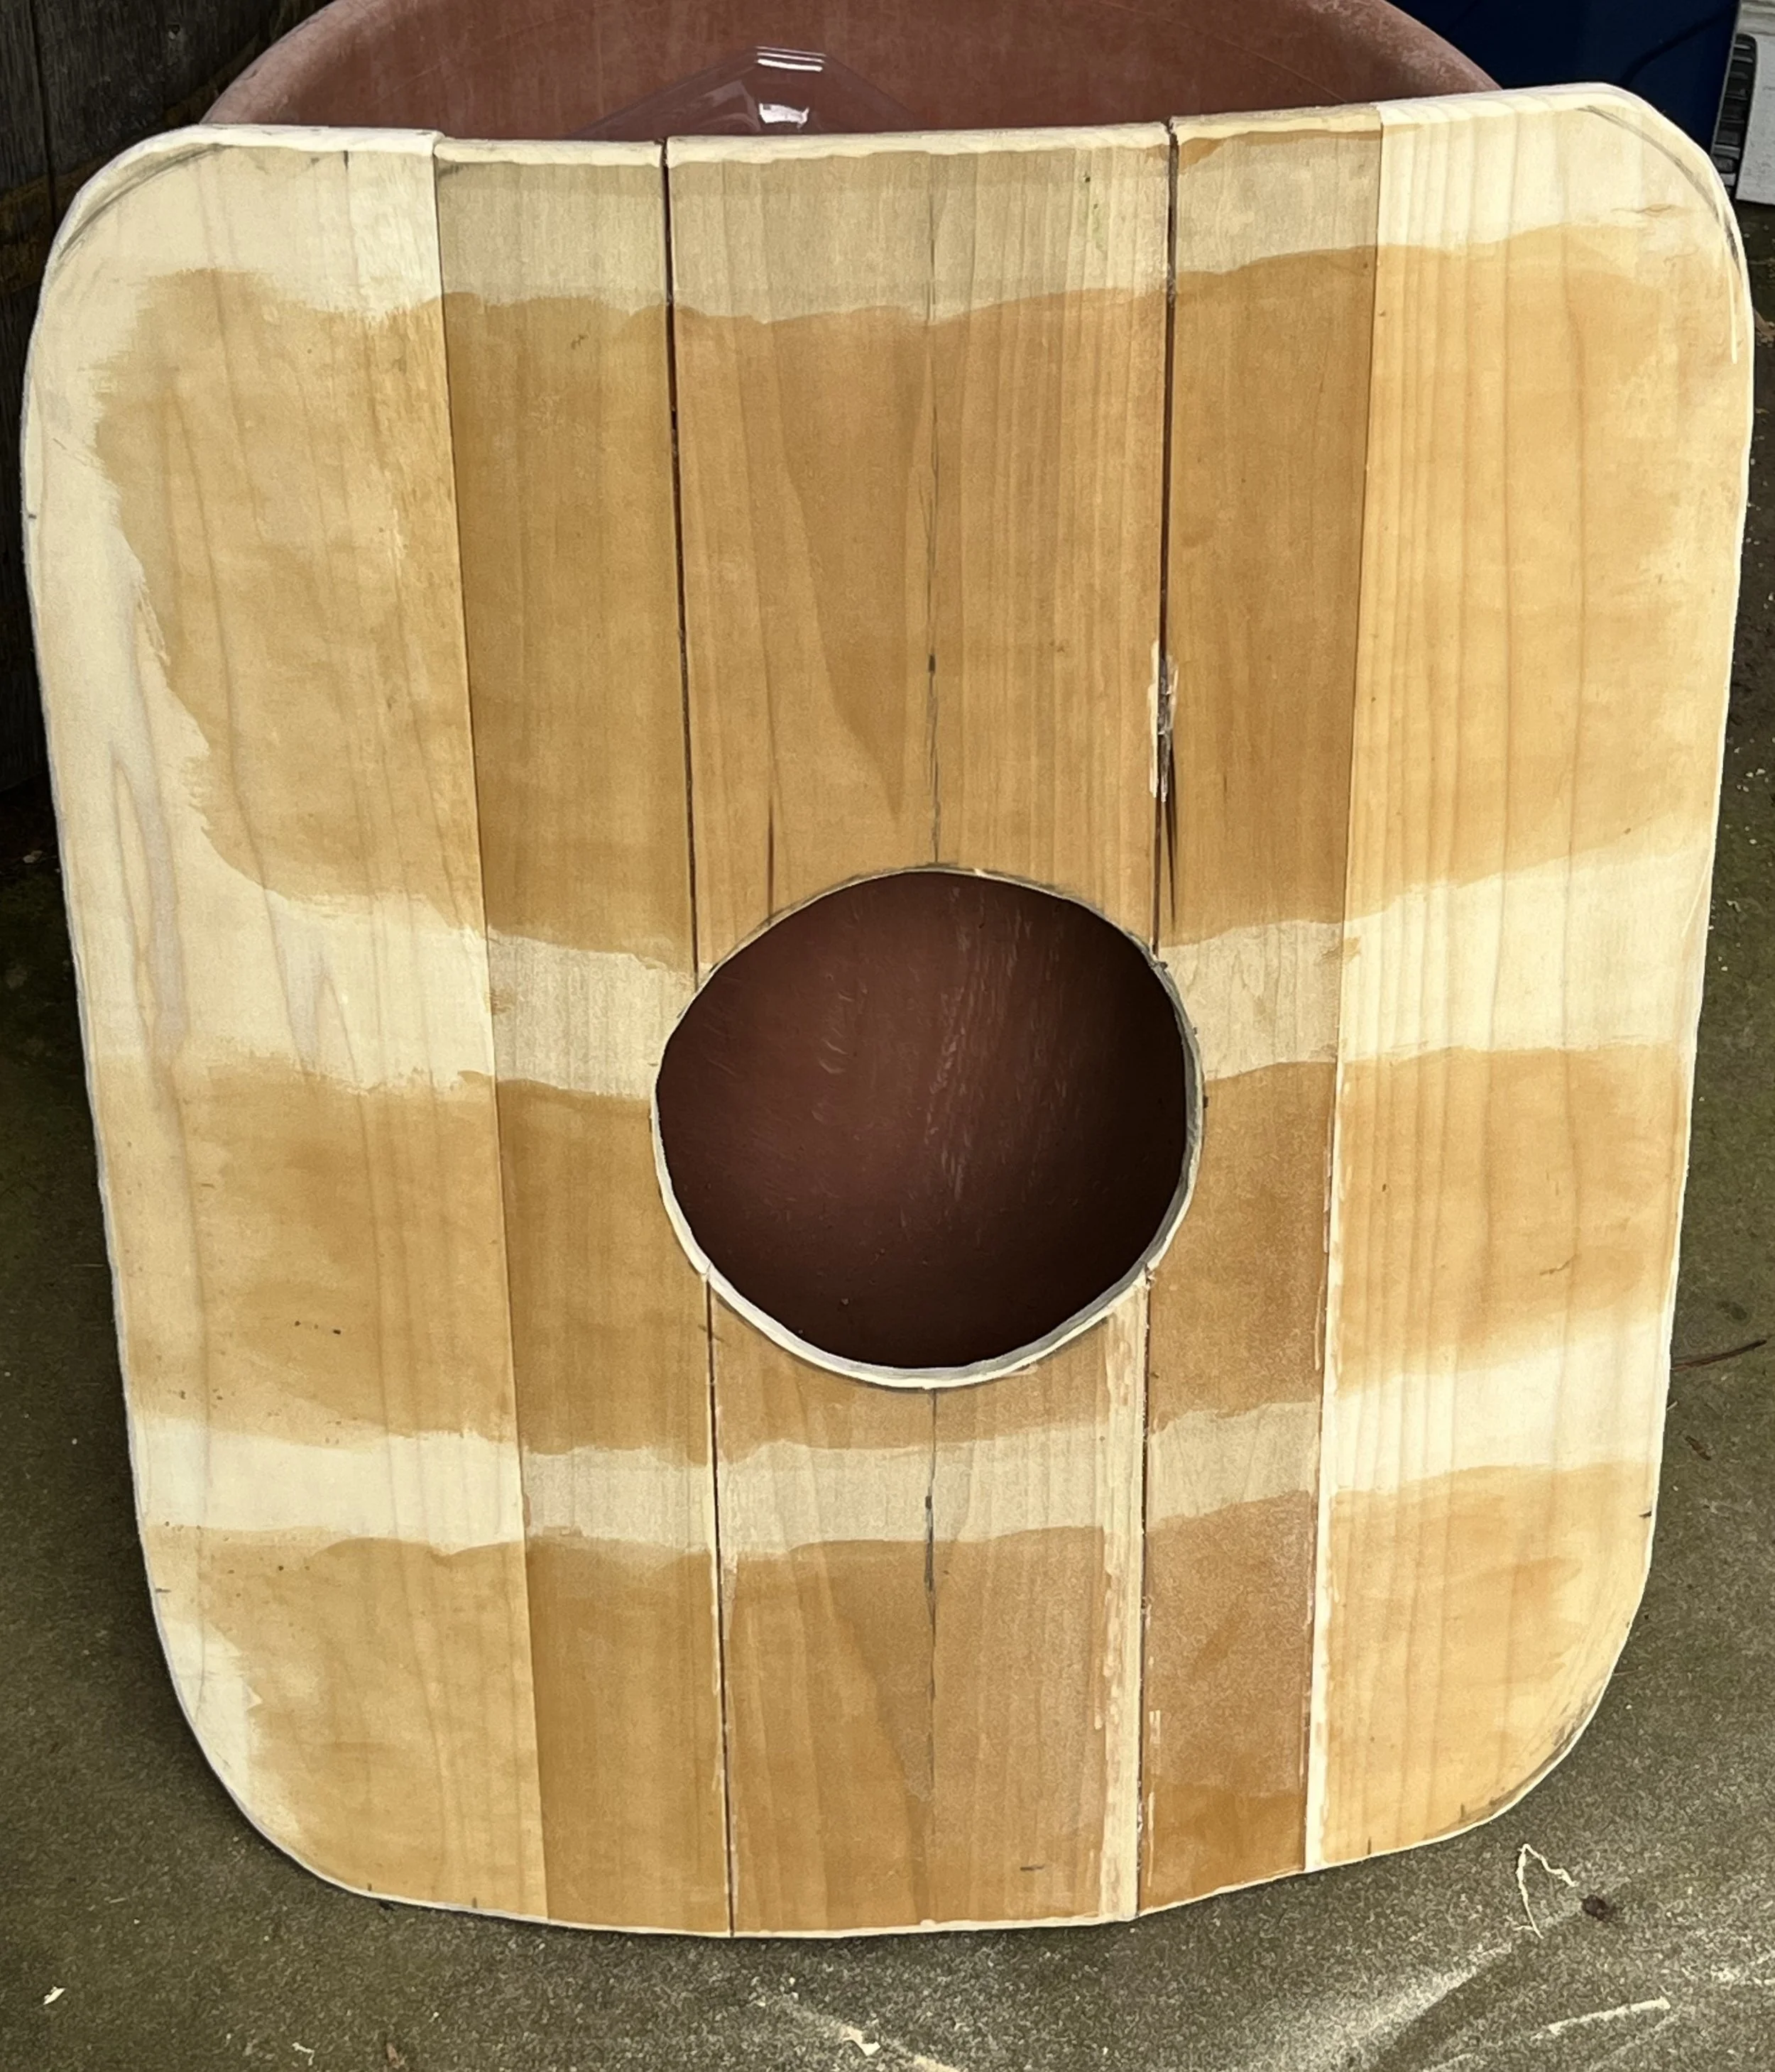
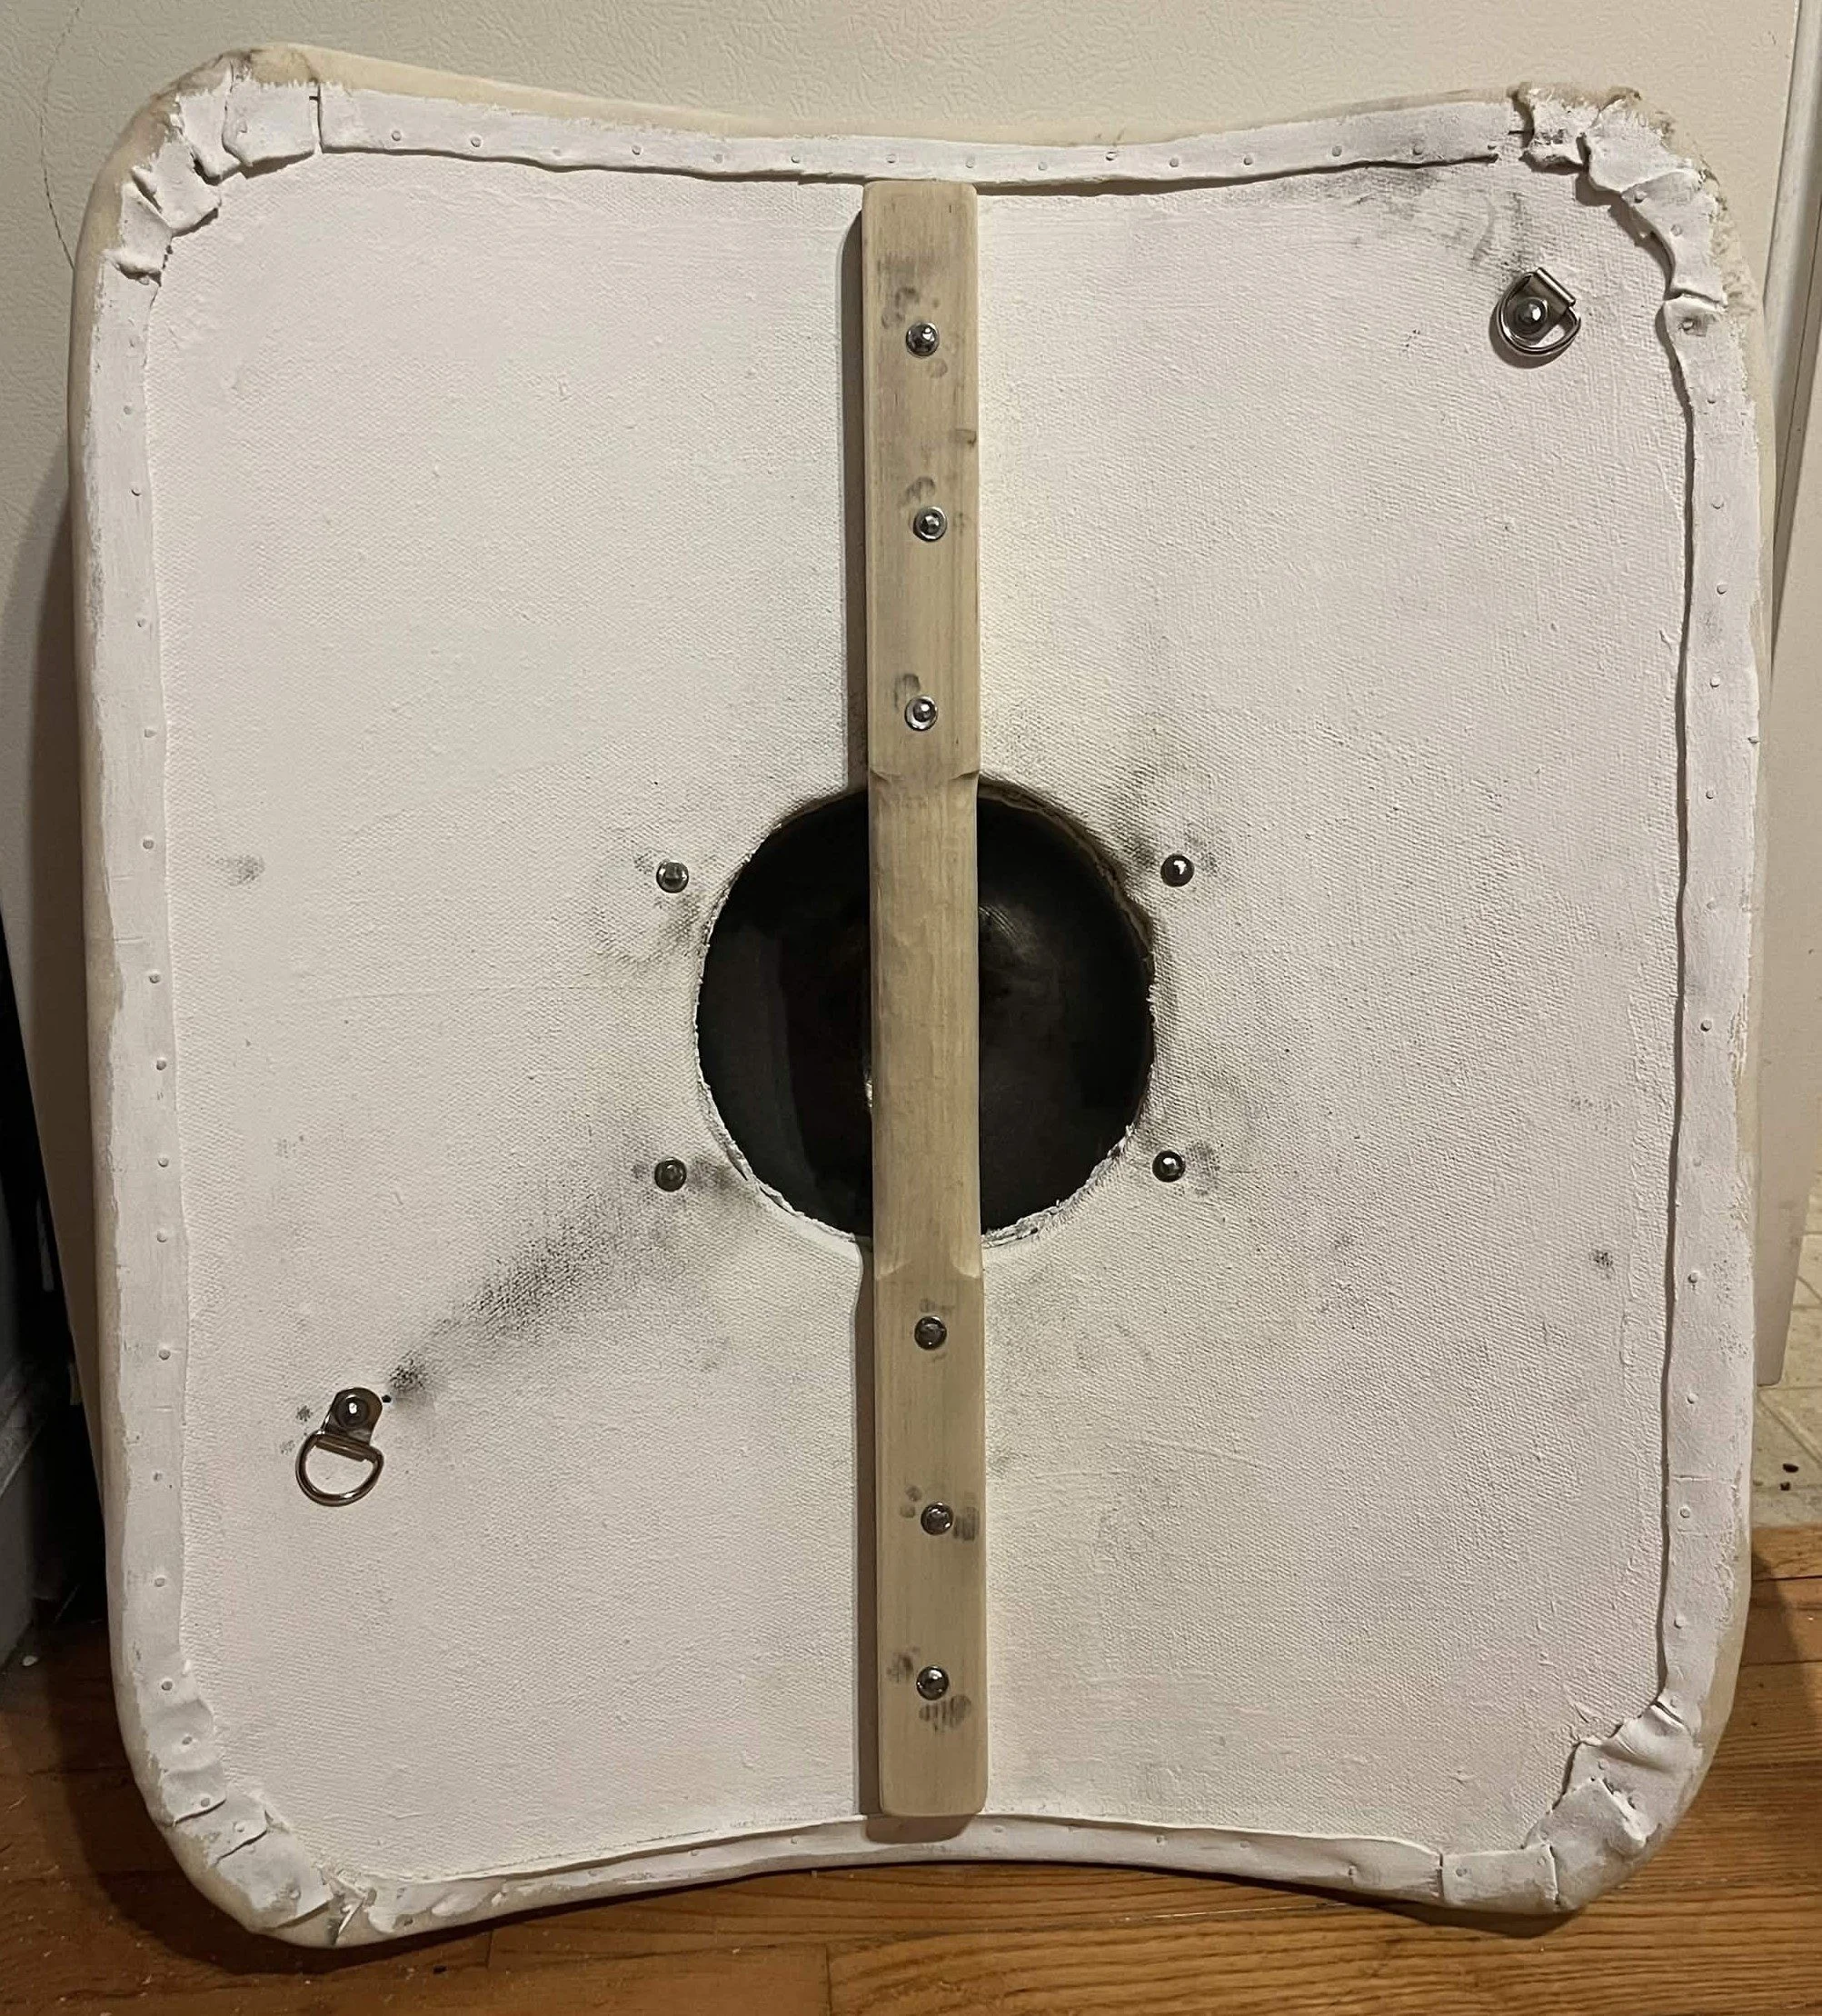
I then cut the hole for the shield boss. This involved measuring to cut out a circle with the diameter of the dome of the shield boss, then drilling a hole near the edge of this circle. After the hole was drilled, fed the blade of a jigsaw fed through the hole to cut out a larger hole. I used sandpaper and a screwdriver to score the surface of the shield for the next step.
Covering
Next step, more glue! Then canvas. In period, the canvas would probably have been made of linen. Here I used a canvas drop cloth from Home Depot (because it was easily to acquire). The product description did not provide any more details about the drop cloth’s construction other than “canvas.” Hopefully it will serve the same function as the period material. After the glue was spread across the wooden surface, I spread the canvas out over the glue. I smoothed out the cloth to prevent folds or pockets. I then immediately applied gesso onto the canvas. The gesso seeped down into the canvas fibers and the glue, helping the fabric adhere to the shield. I then left it to dry.
Pictured above – sticky science!
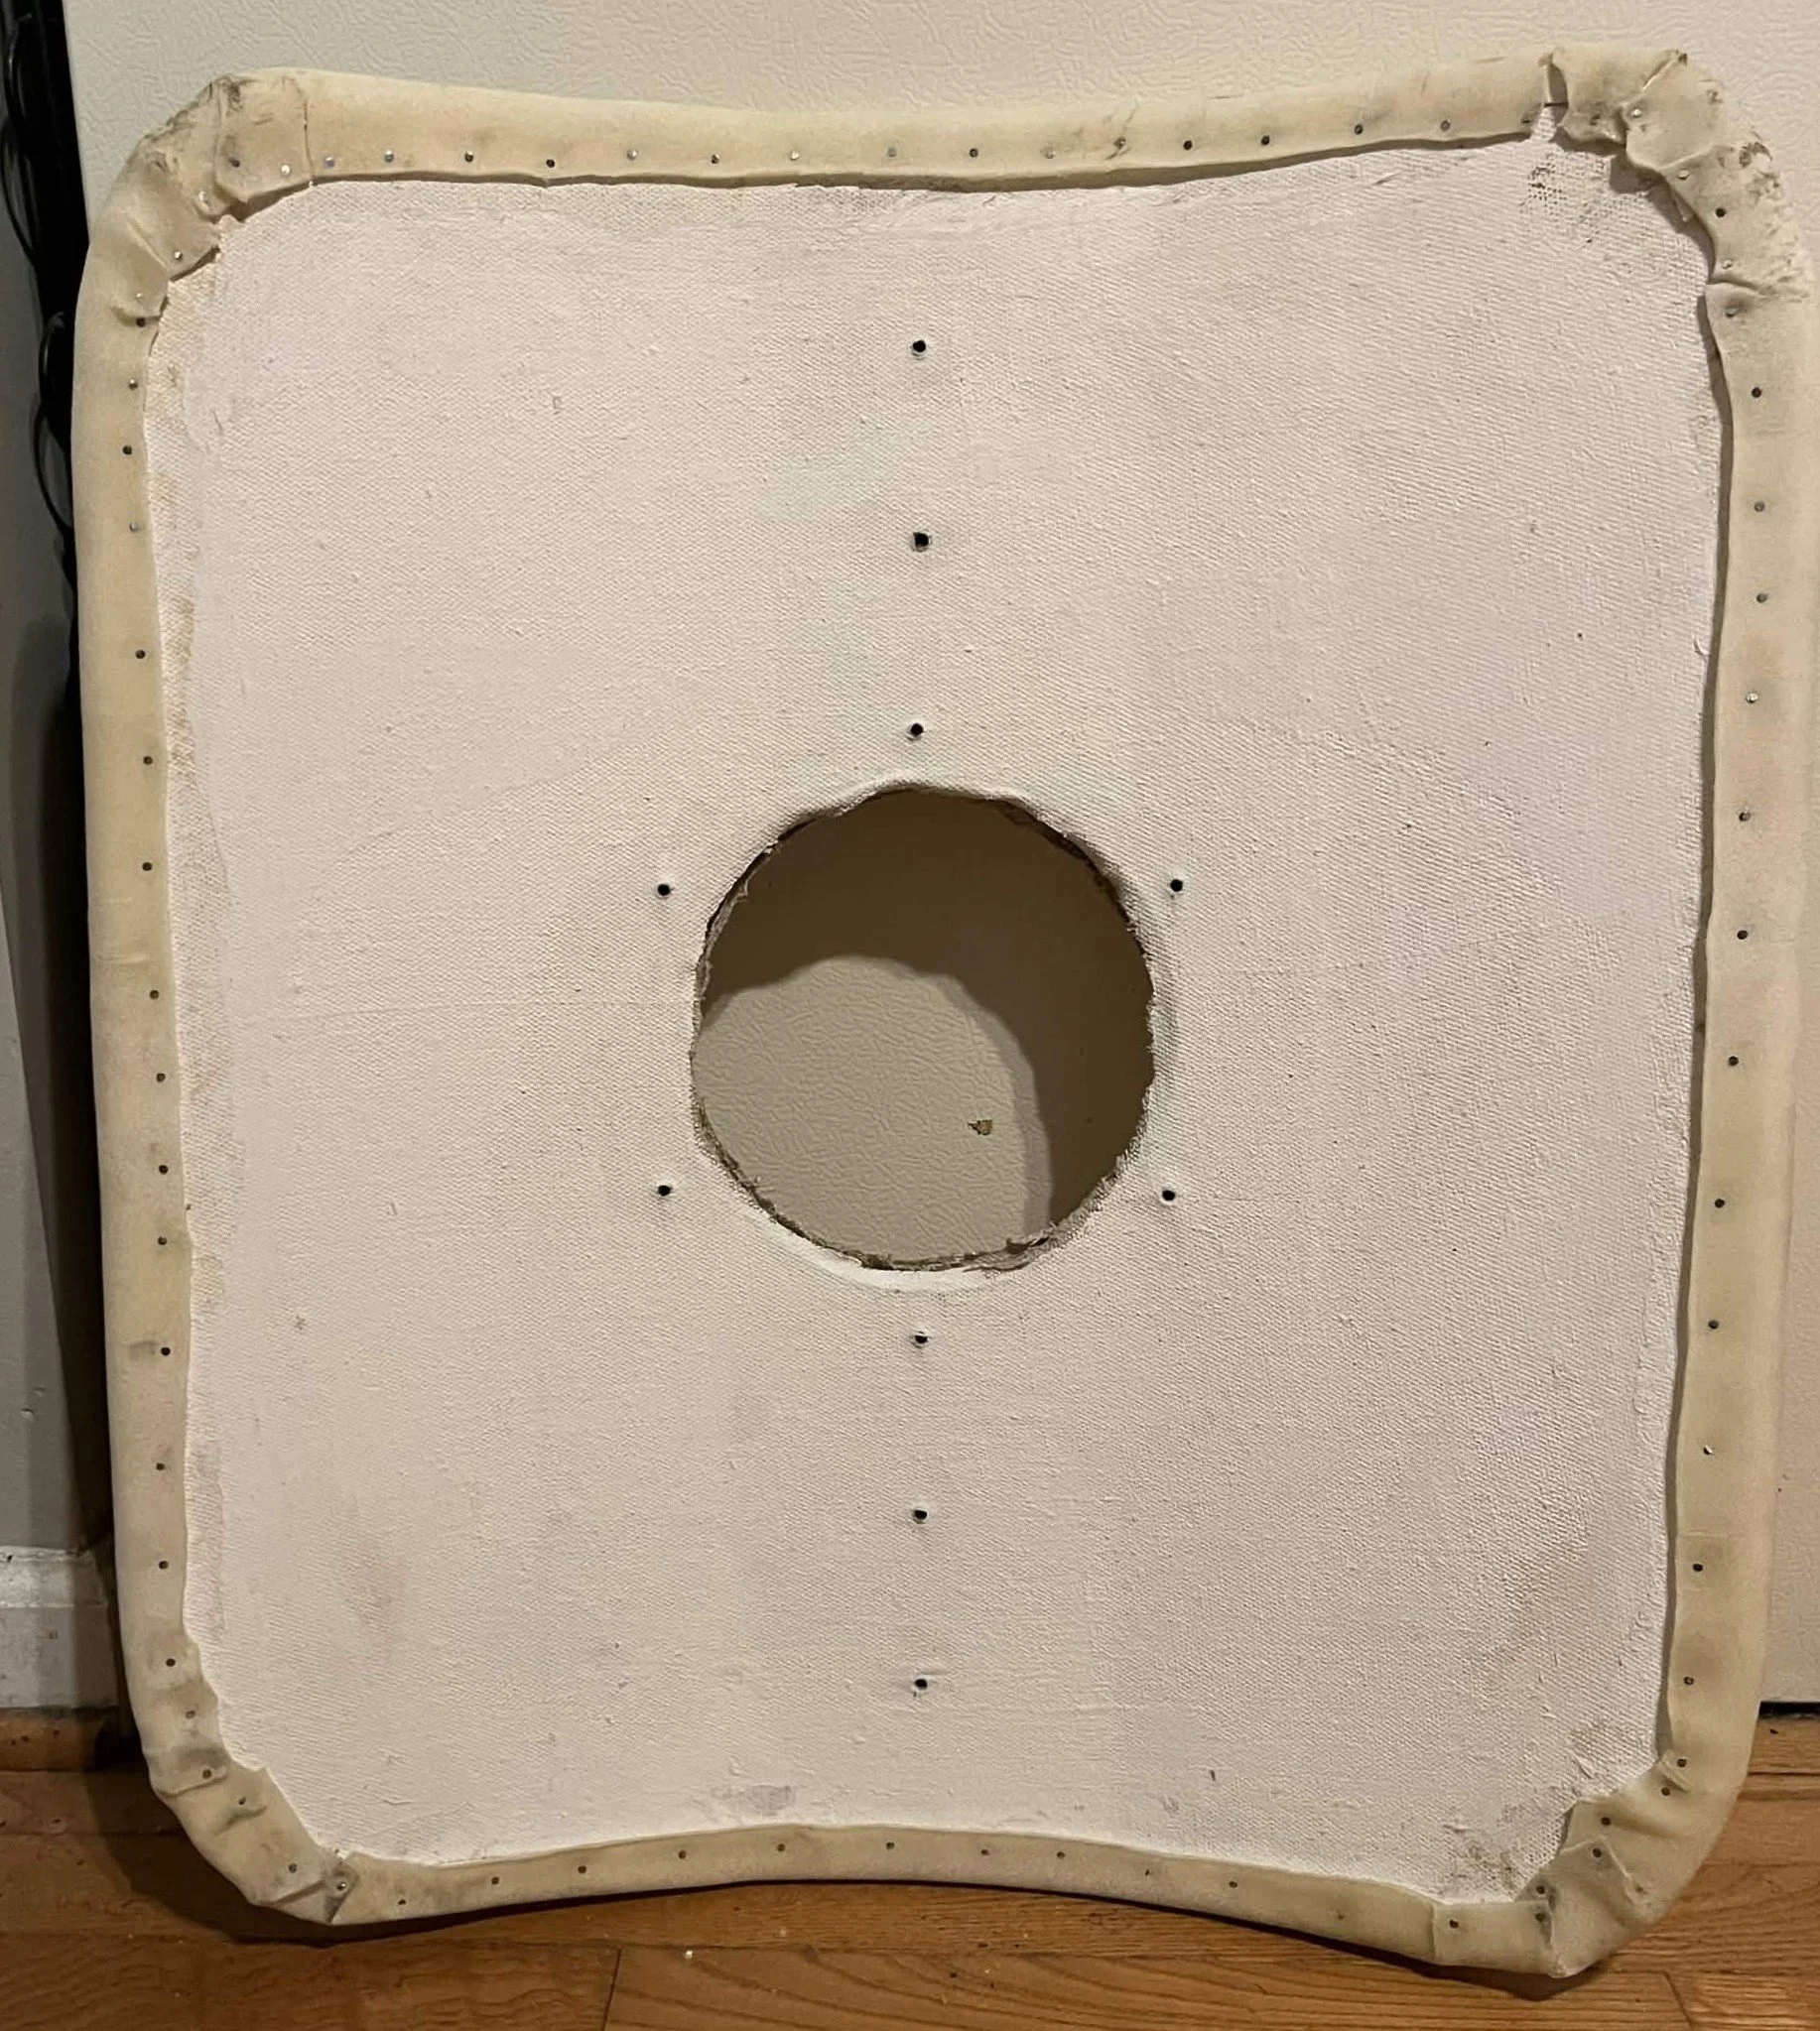
Next, canvas on the other side! Shields from the 14-15th century appear to have been covered front and back, so I repeated the process from the front onto the back. More drying followed.
Next, I applied more canvas to the front of the shield. (This time I oriented the fabric on the diagonal to try to very how the fabric ran across the surface, which may help the shield to be more protective (every bit helps)). Using multiple layers of textiles may seem unnecessary (adding extra weight and cost), but it is appropriate to the time period, and likely is part of the protection offered by the shield. King Henry V’s funeral shield (dated to around 1422) has a core of Lindenwood, with multiple layers of canvas, other textiles, chalk, iron oxide, charcoal, and glue. The backside of the shield alone consists of seven layers. (Kohlmorgen, Der Mittelalterliche Reiterschild , 115-116.).
Next is rawhide. This aspect varies a lot for shield construction during the Middle Ages. Some shields are covered in untanned, but dried animal skins (either rawhide or parchment). Others are edged with leather or rawhide. Many surviving shield examples do not have a leather or rawhide covering or edging at all. The rawhide adds to the protective aspect of the shield, and can prolong its working life. The trade-off is that it increases weight and cost. The Black Prince’s shield at Canterbury Cathedral is covered in rawhide, but Henry V’s shield at Westminster Abby is not. (Kohlmorgen, Der Mittelalterliche Reiterschild , 110-116 & 129). It just seems to depend on the maker or the receiver’s preference.
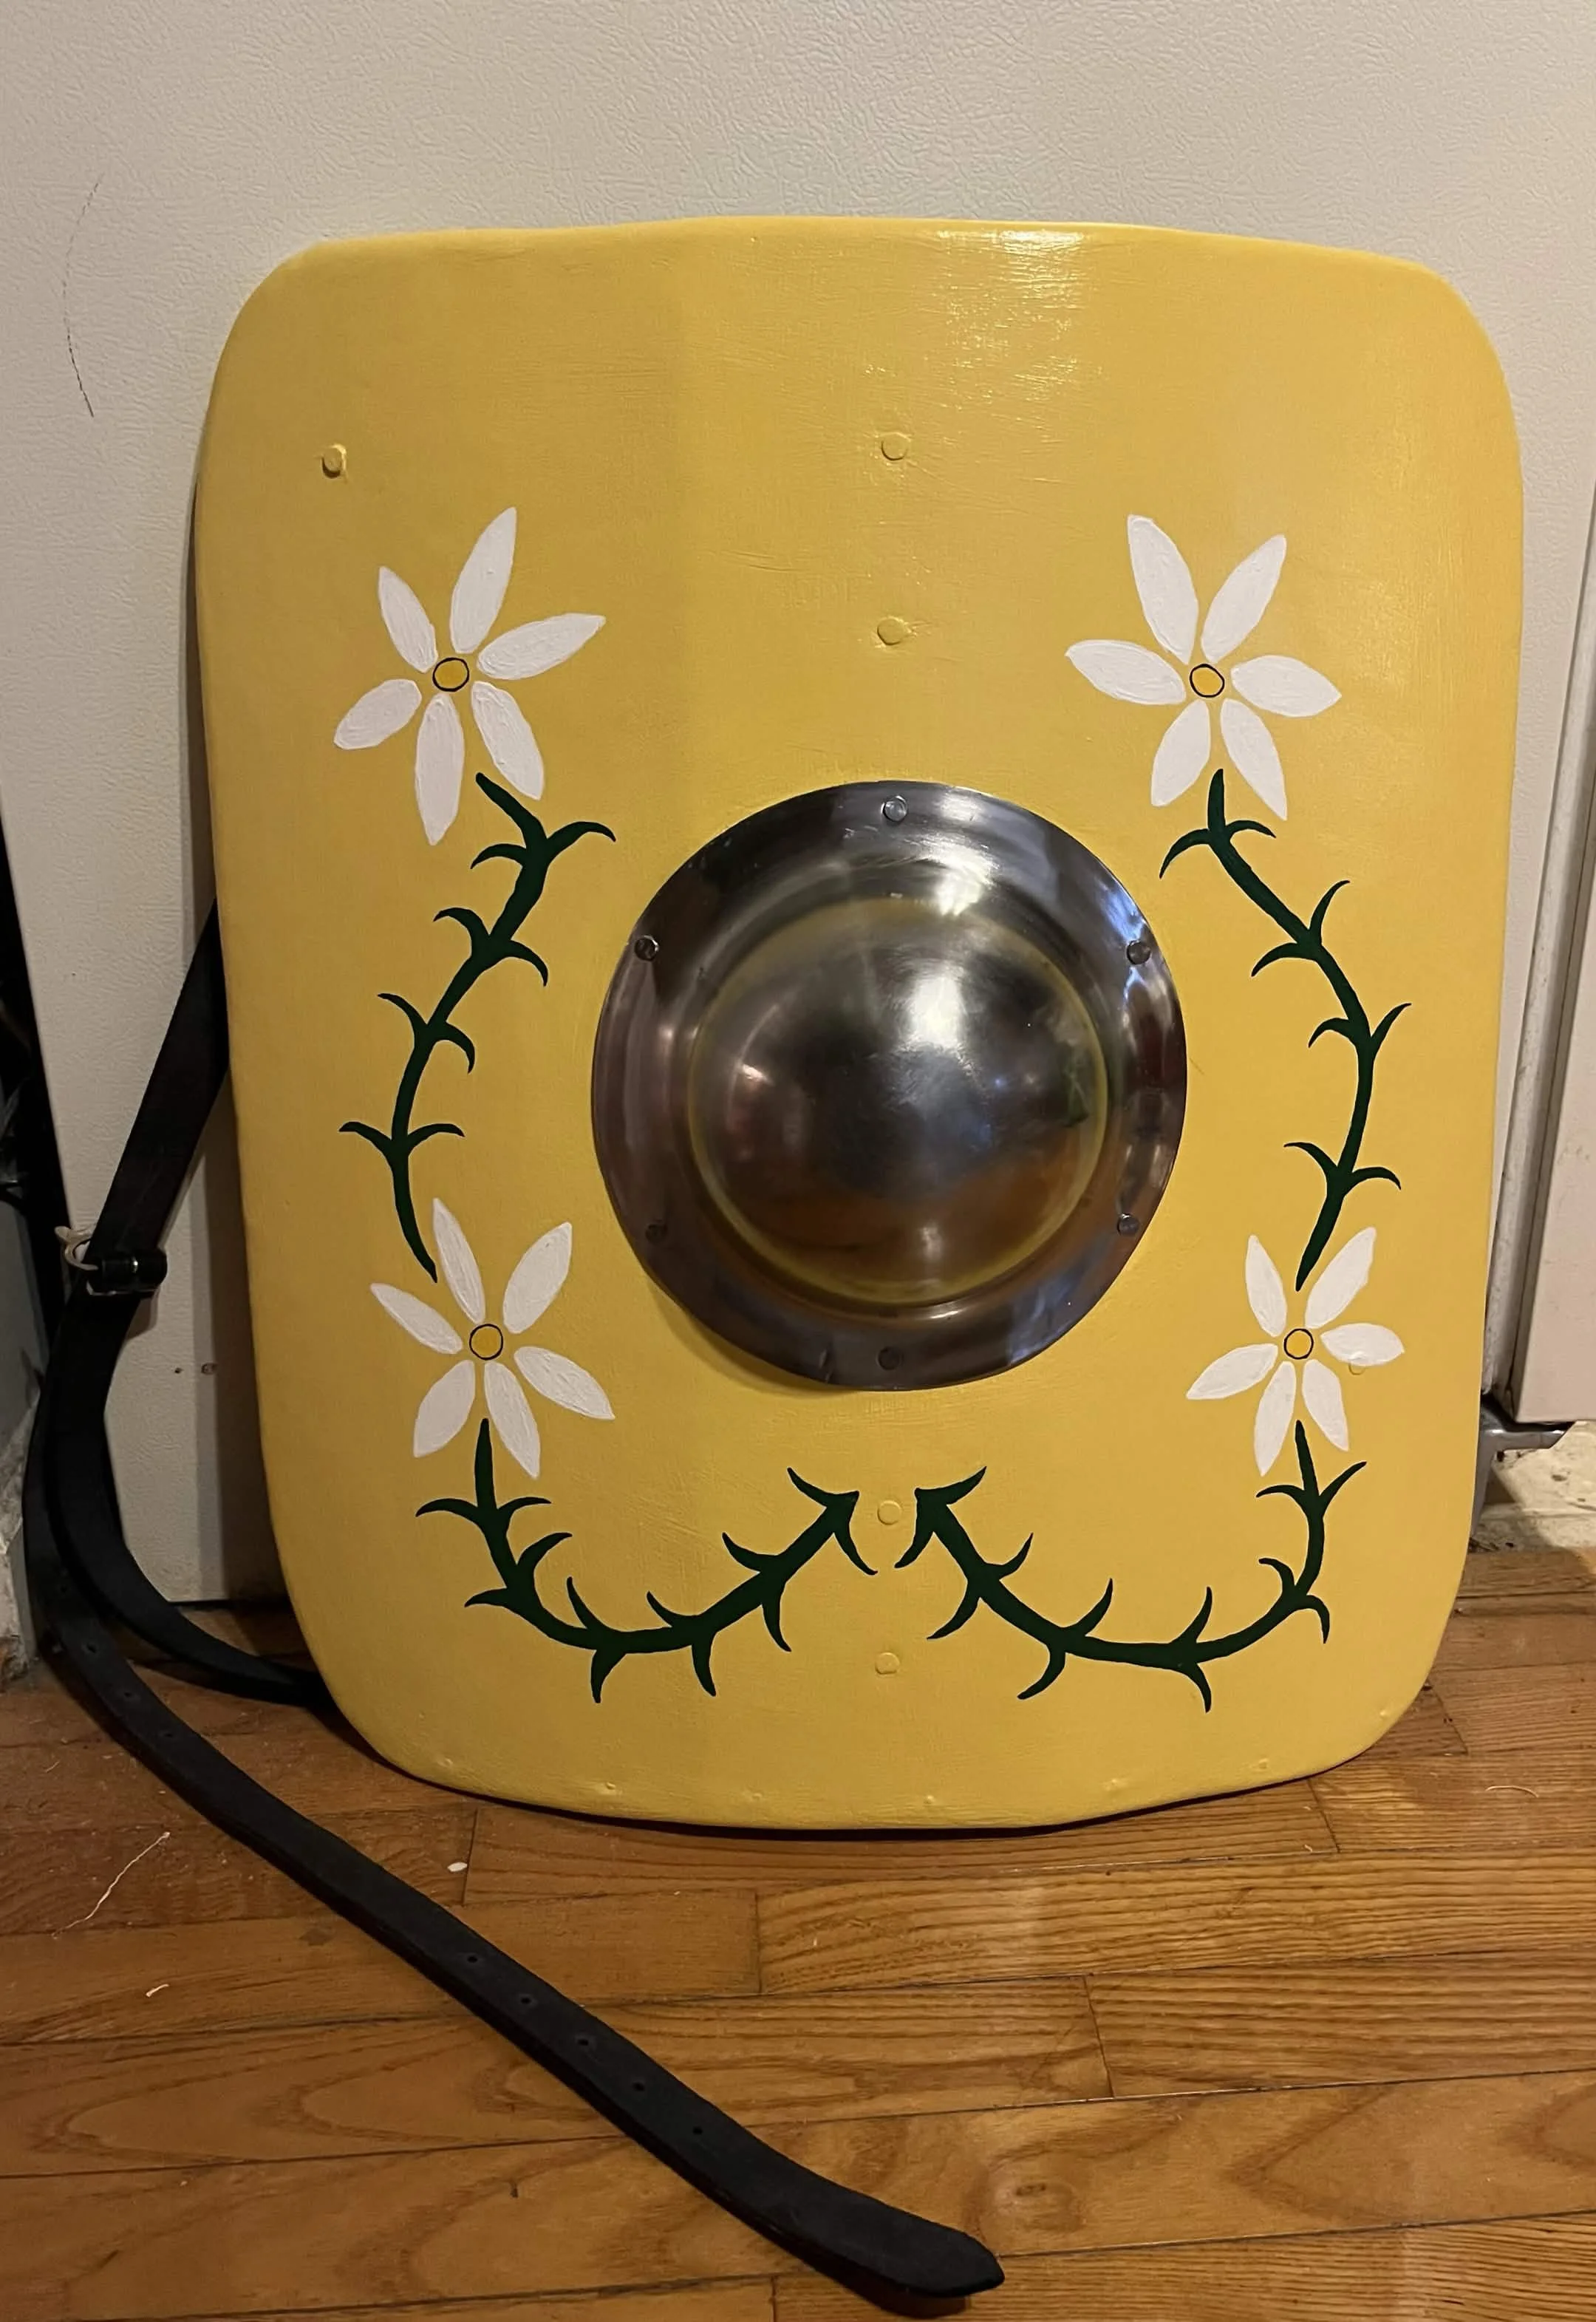
The shields of the Scottish Guard were intended for the King of France’s personal guard - cost was probably not a large concern. Protectiveness of a shield might have been more favored given the Scottish Guards’ role. However, The Adoration of the Magi already depicts the Scottish Guard as pretty heavily armored, particularly for archers. Thus, the extra protection of a rawhide or leather layer may not have been necessary. On the other hand, the shields are shown to have a guige strap over the shoulder. This would have made any weight increase easier to manage both on and off the field.
I looked closely at The Adoration of the Magi. I eventually got a higher quality image, and there appears to be a border between the edge and the painted flowers on the shields. This may be an artist’s portrayal of a rawhide or leather boarder, or it could be purely decorative.
What made up my mind was a theory about these shields - I think these were ani-missile shields, not general infantry shields. I will discuss this theory more at another time. However, for the sake of brevity, I will skip it for now. I ultimately decided that anything that could add to the shield’s protective qualities would probably be the way to go… I also had a ton of rawhide. So, onward!
I soaked the rawhide to make it pliable. I had to soak a lot of it, but I guess this is why I have a bathtub.
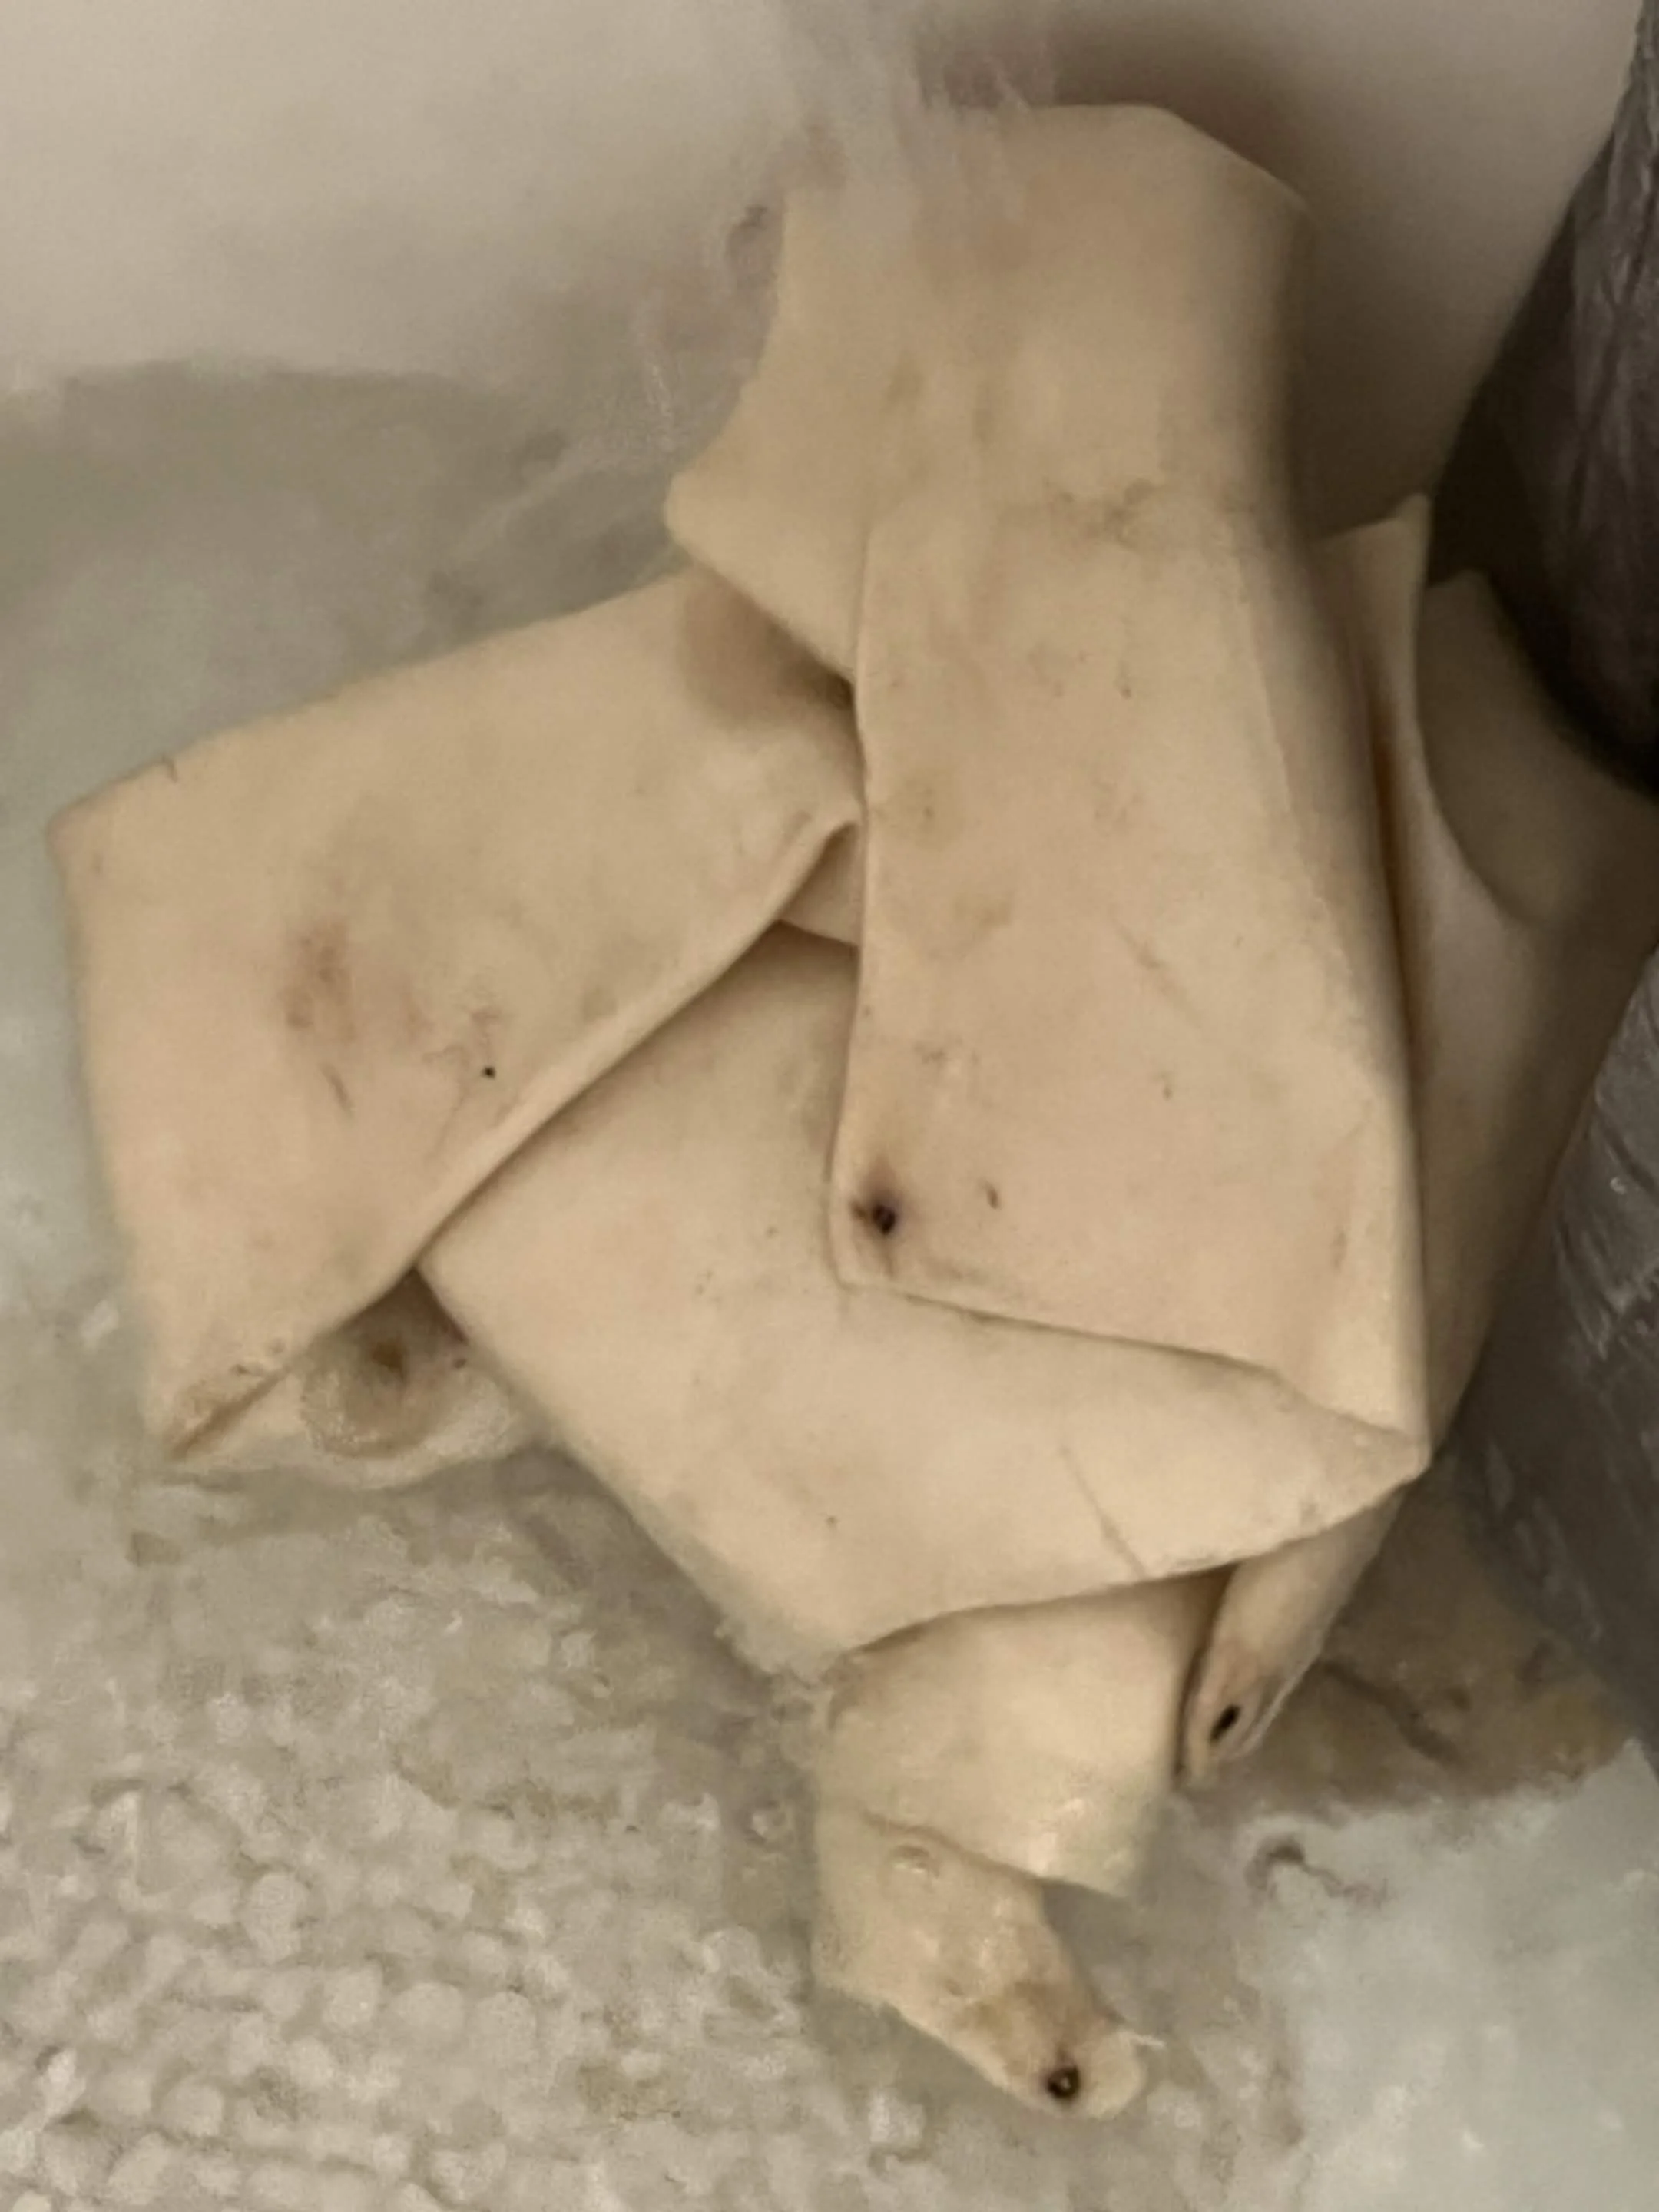
Pictured above – wet science!
After the rawhide was pliable, I wiped away the excess water and applied glue to the front of the shield. I then stretched the rawhide over the shield and clamped it in place. I put thin strips of wood between the mouths of the clamps and the front of the shield to keep the pressure from the clamps from leaving an impression. I then tacked the rawhide down to the shield. First, I tacked it along one edge on the front (I was having a hard time working with it, even with all of the clamps). However, I finished taking the rawhide down along the back side, as this was how it was done on the Black Prince’s Shield. (Kohlmorgen, Der Mittelalterliche Reiterschild , 112). Now more waiting and drying.
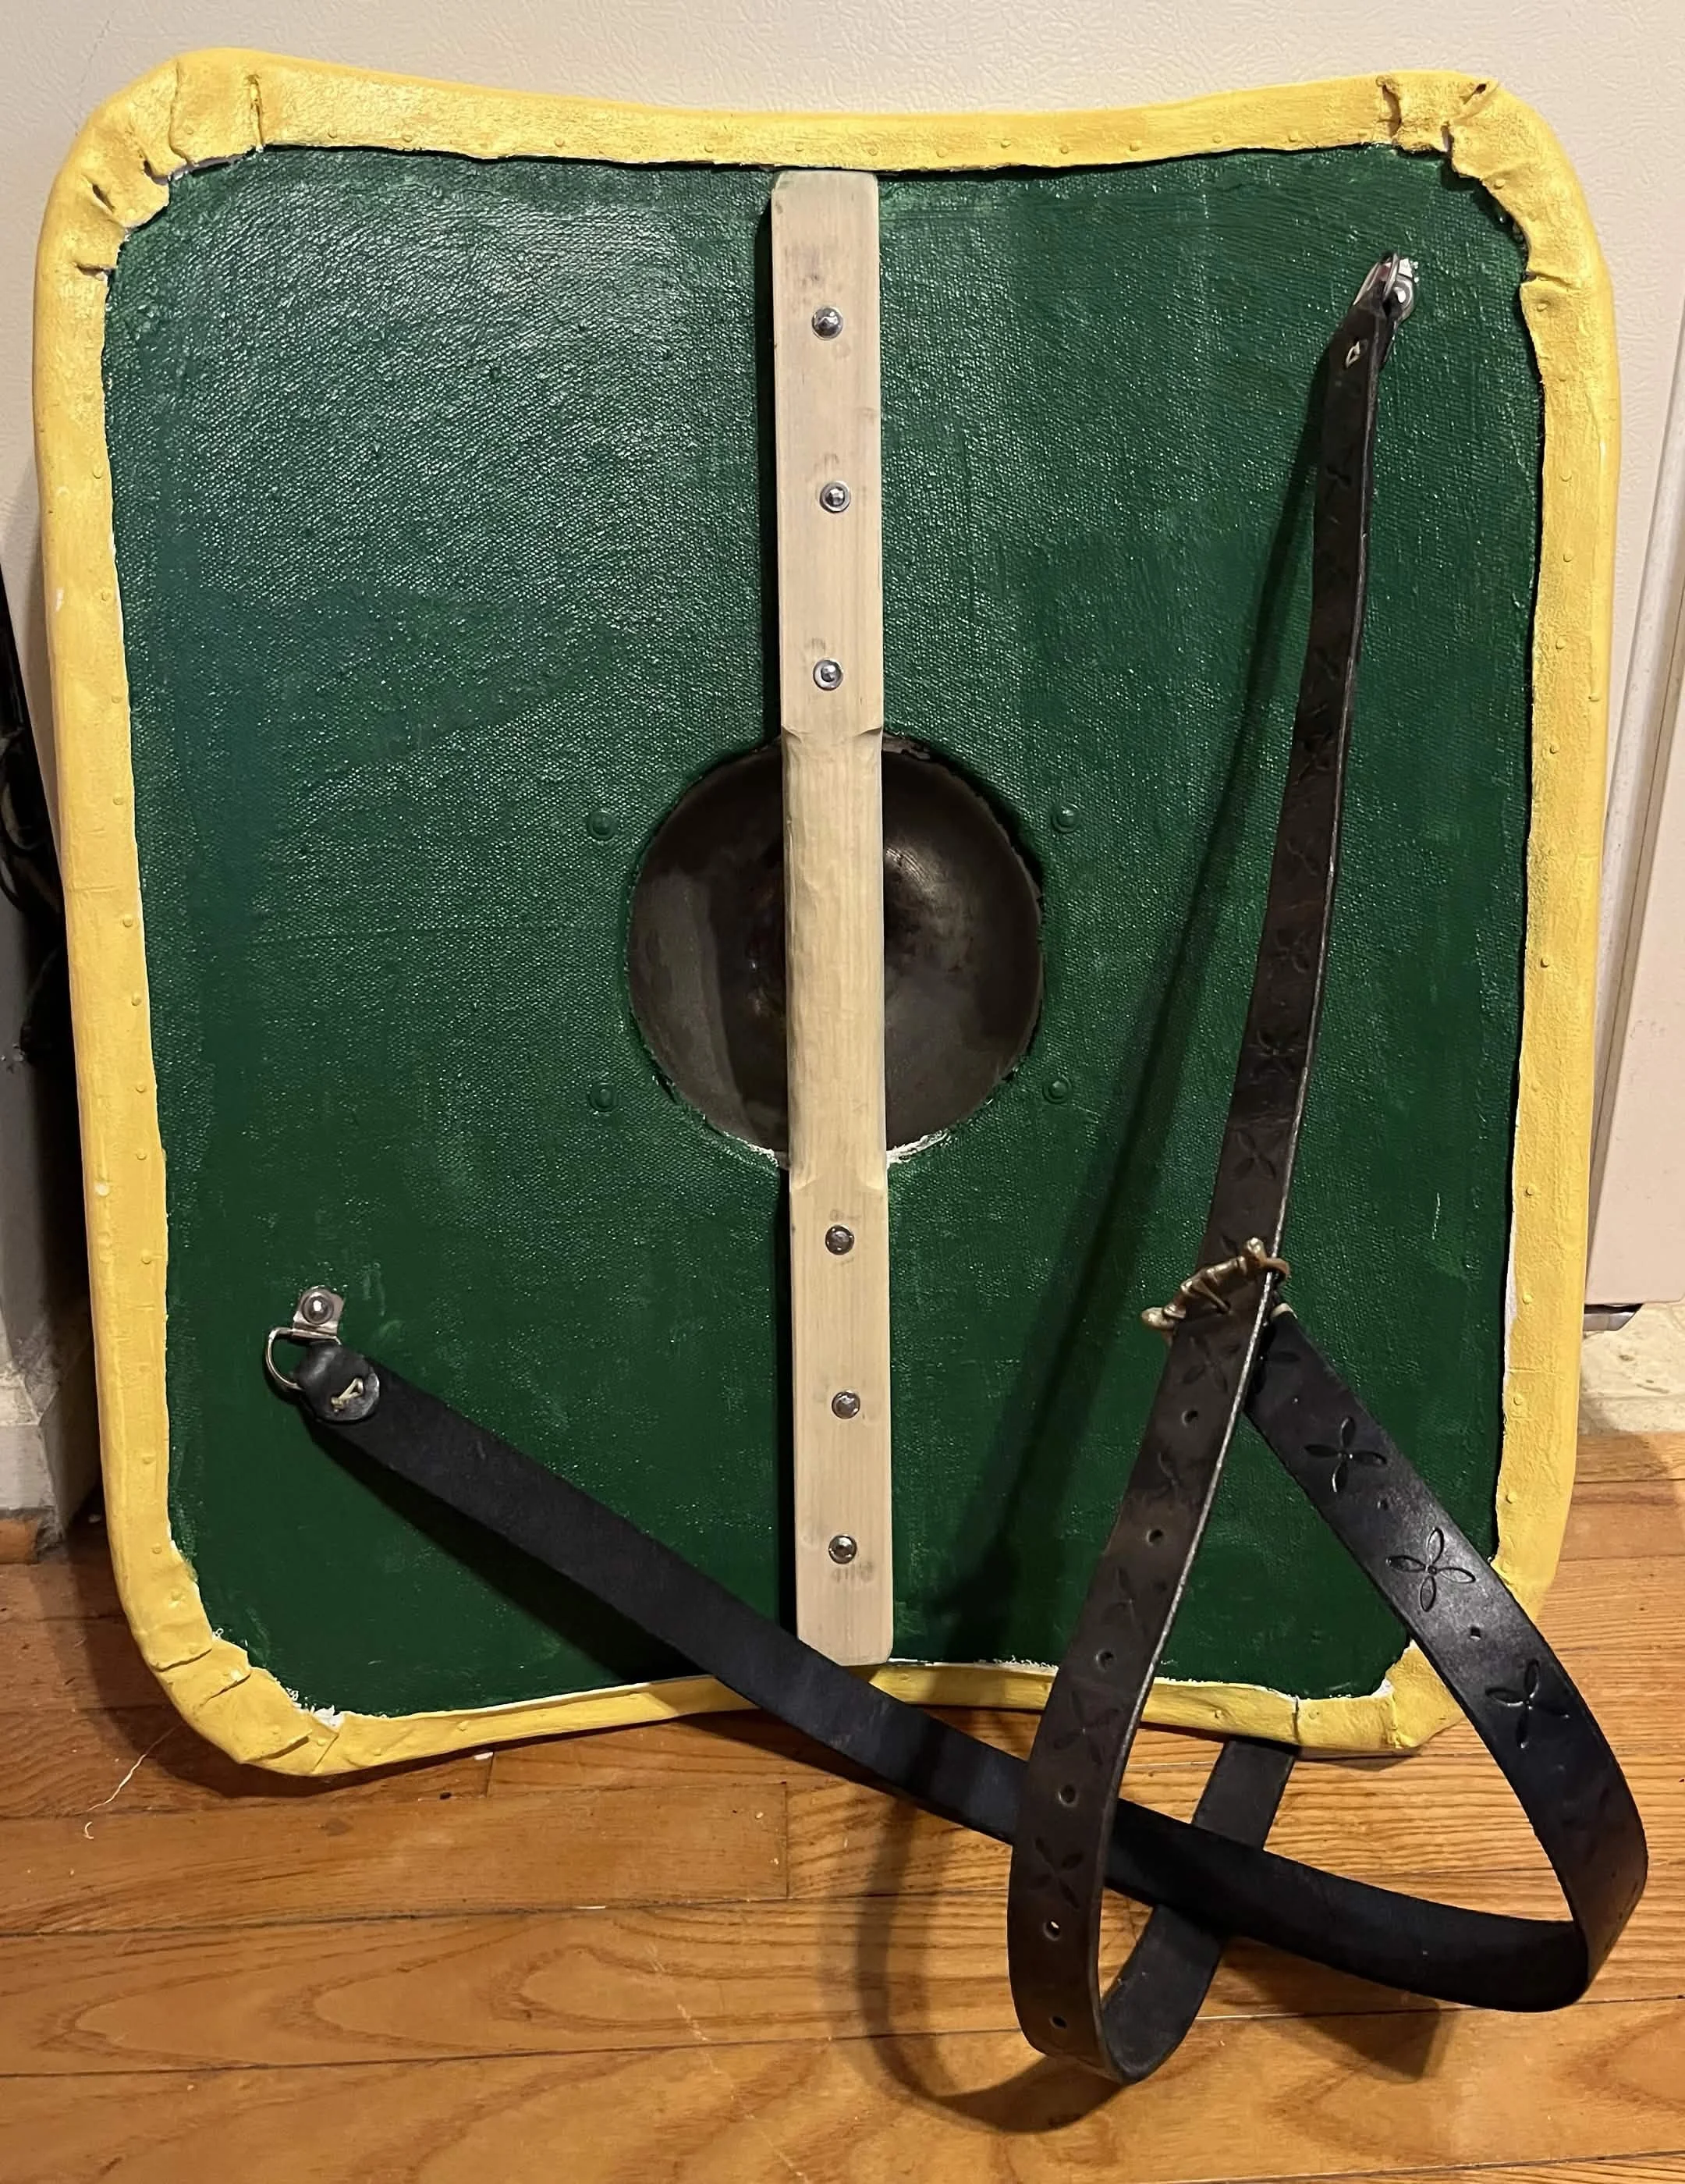
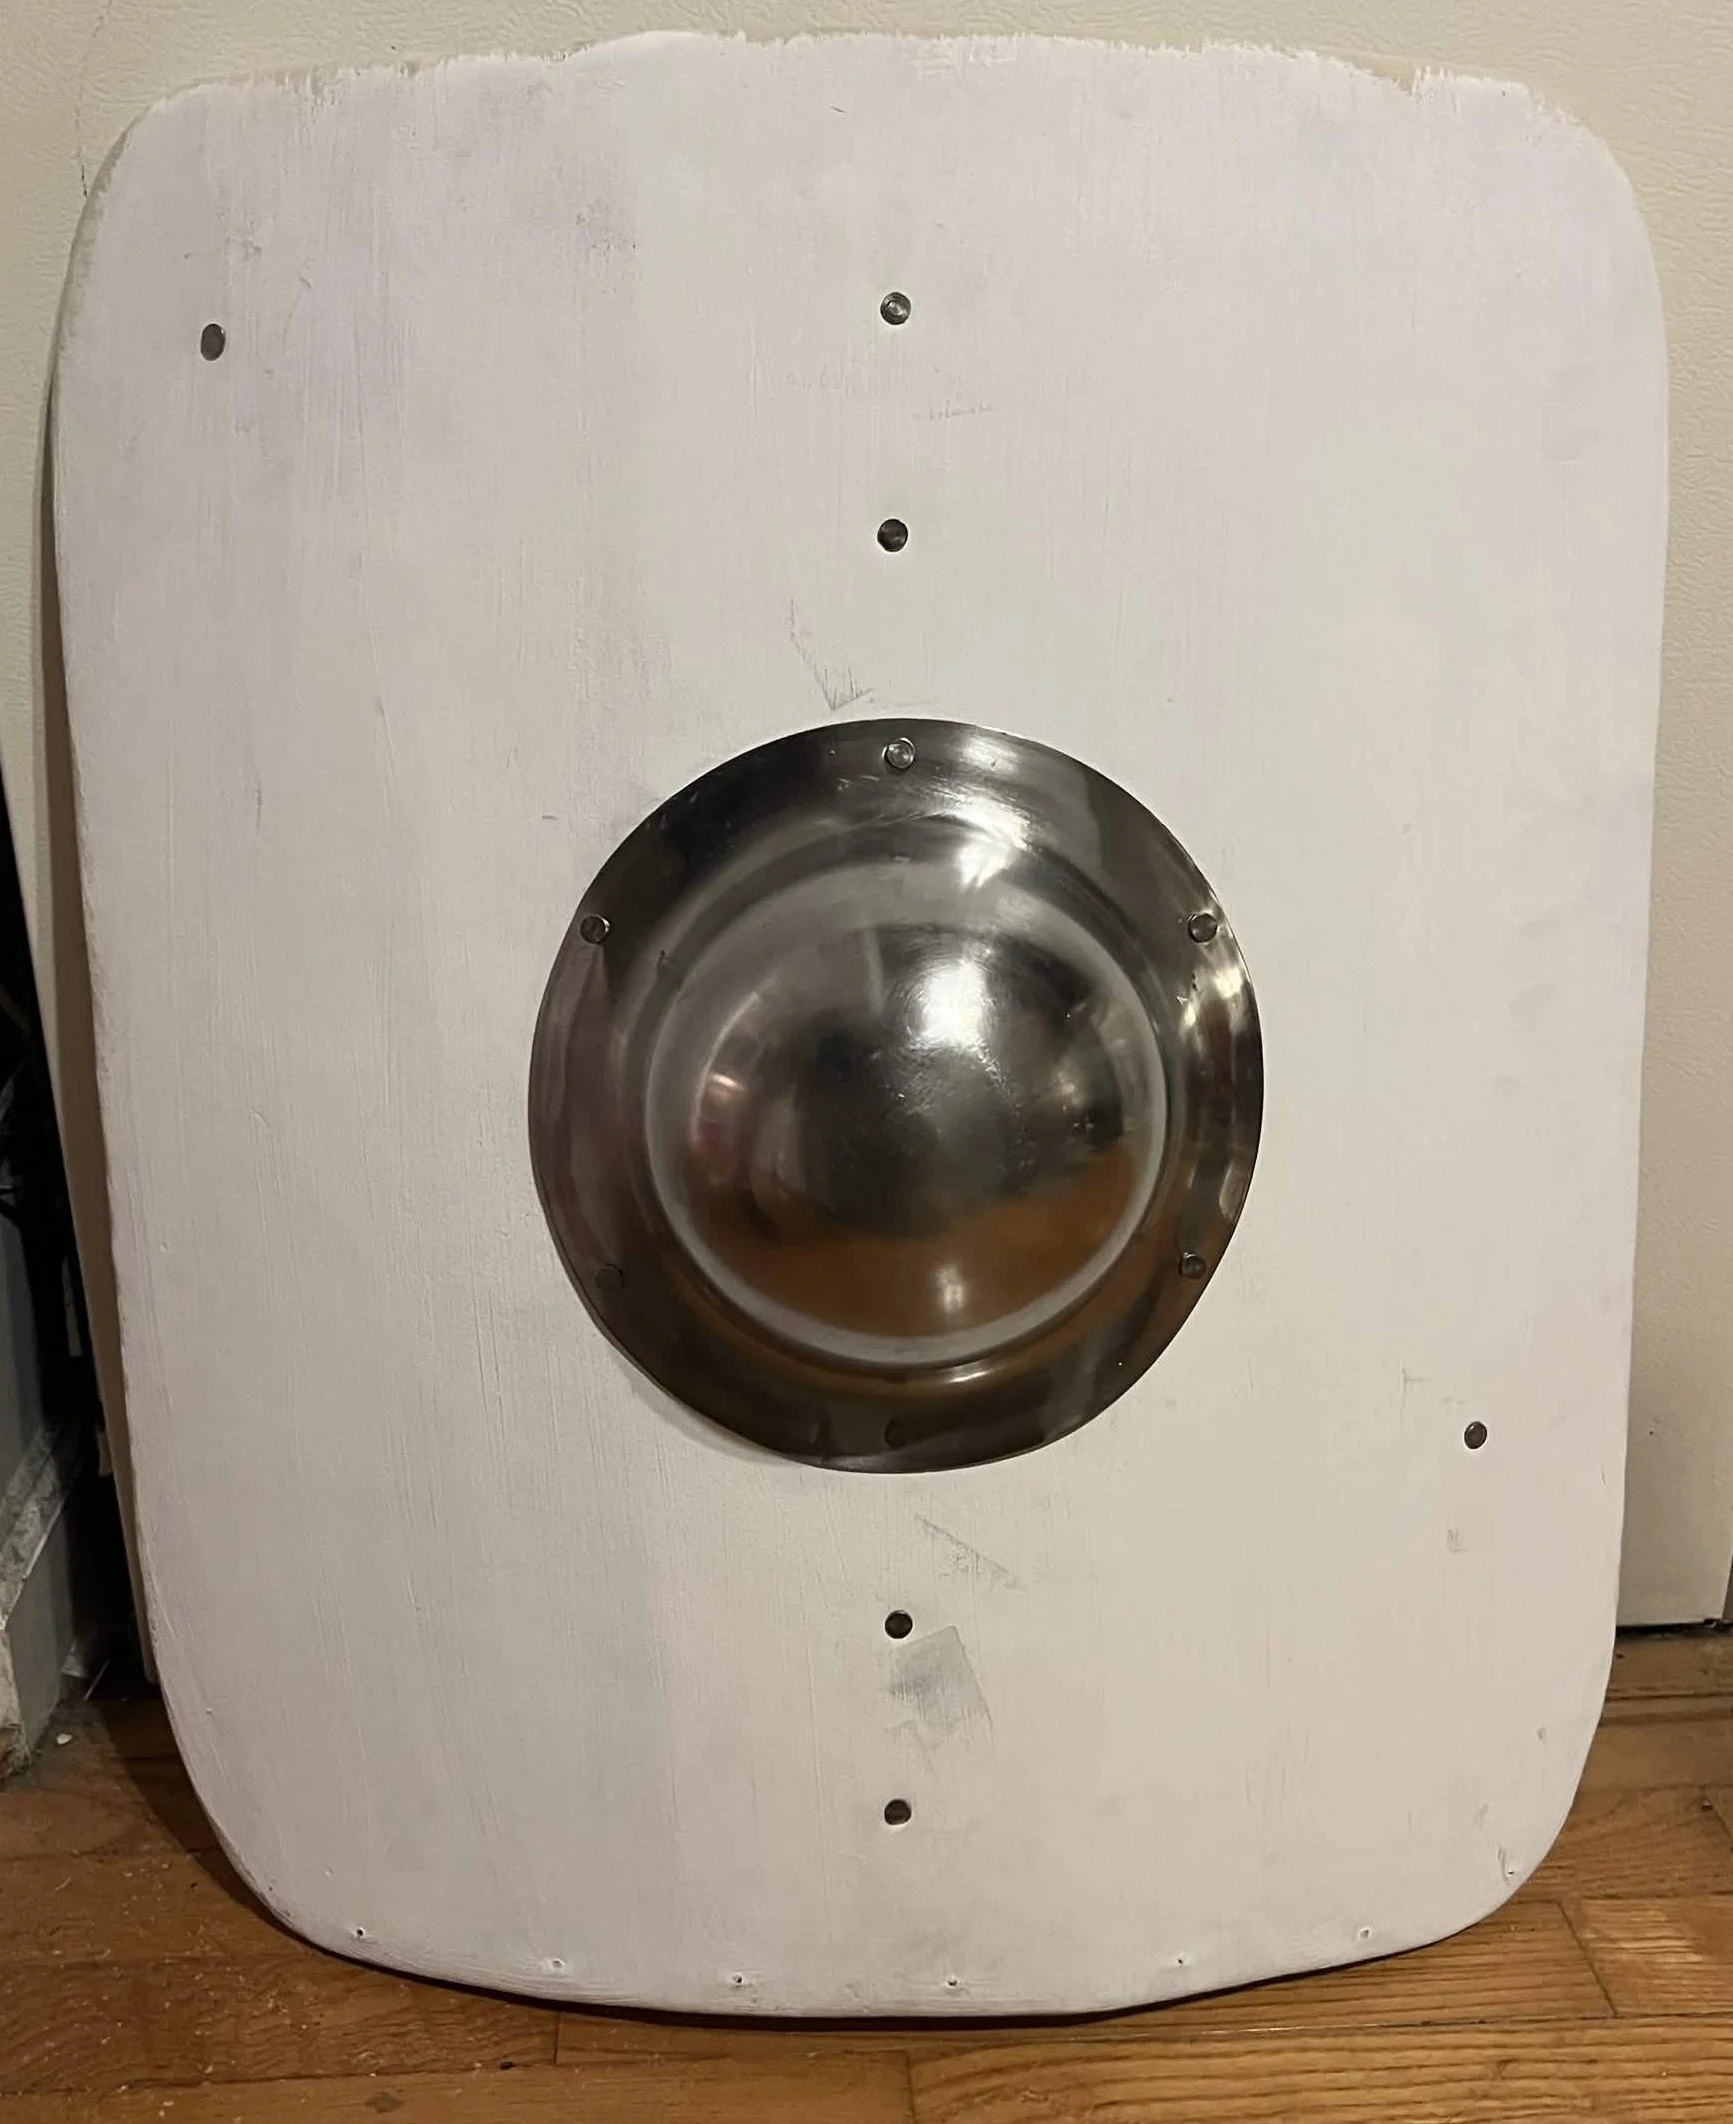
Shield Boss
The Adoration of the Magi shows the shields of the Scottish Guard having shield bosses. The bosses also seem fairly large; however, (again) I do not have measurements for these shields. I do not have the ability to make a shield boss, so I got a stainless steel boss online. There was a slight problem.
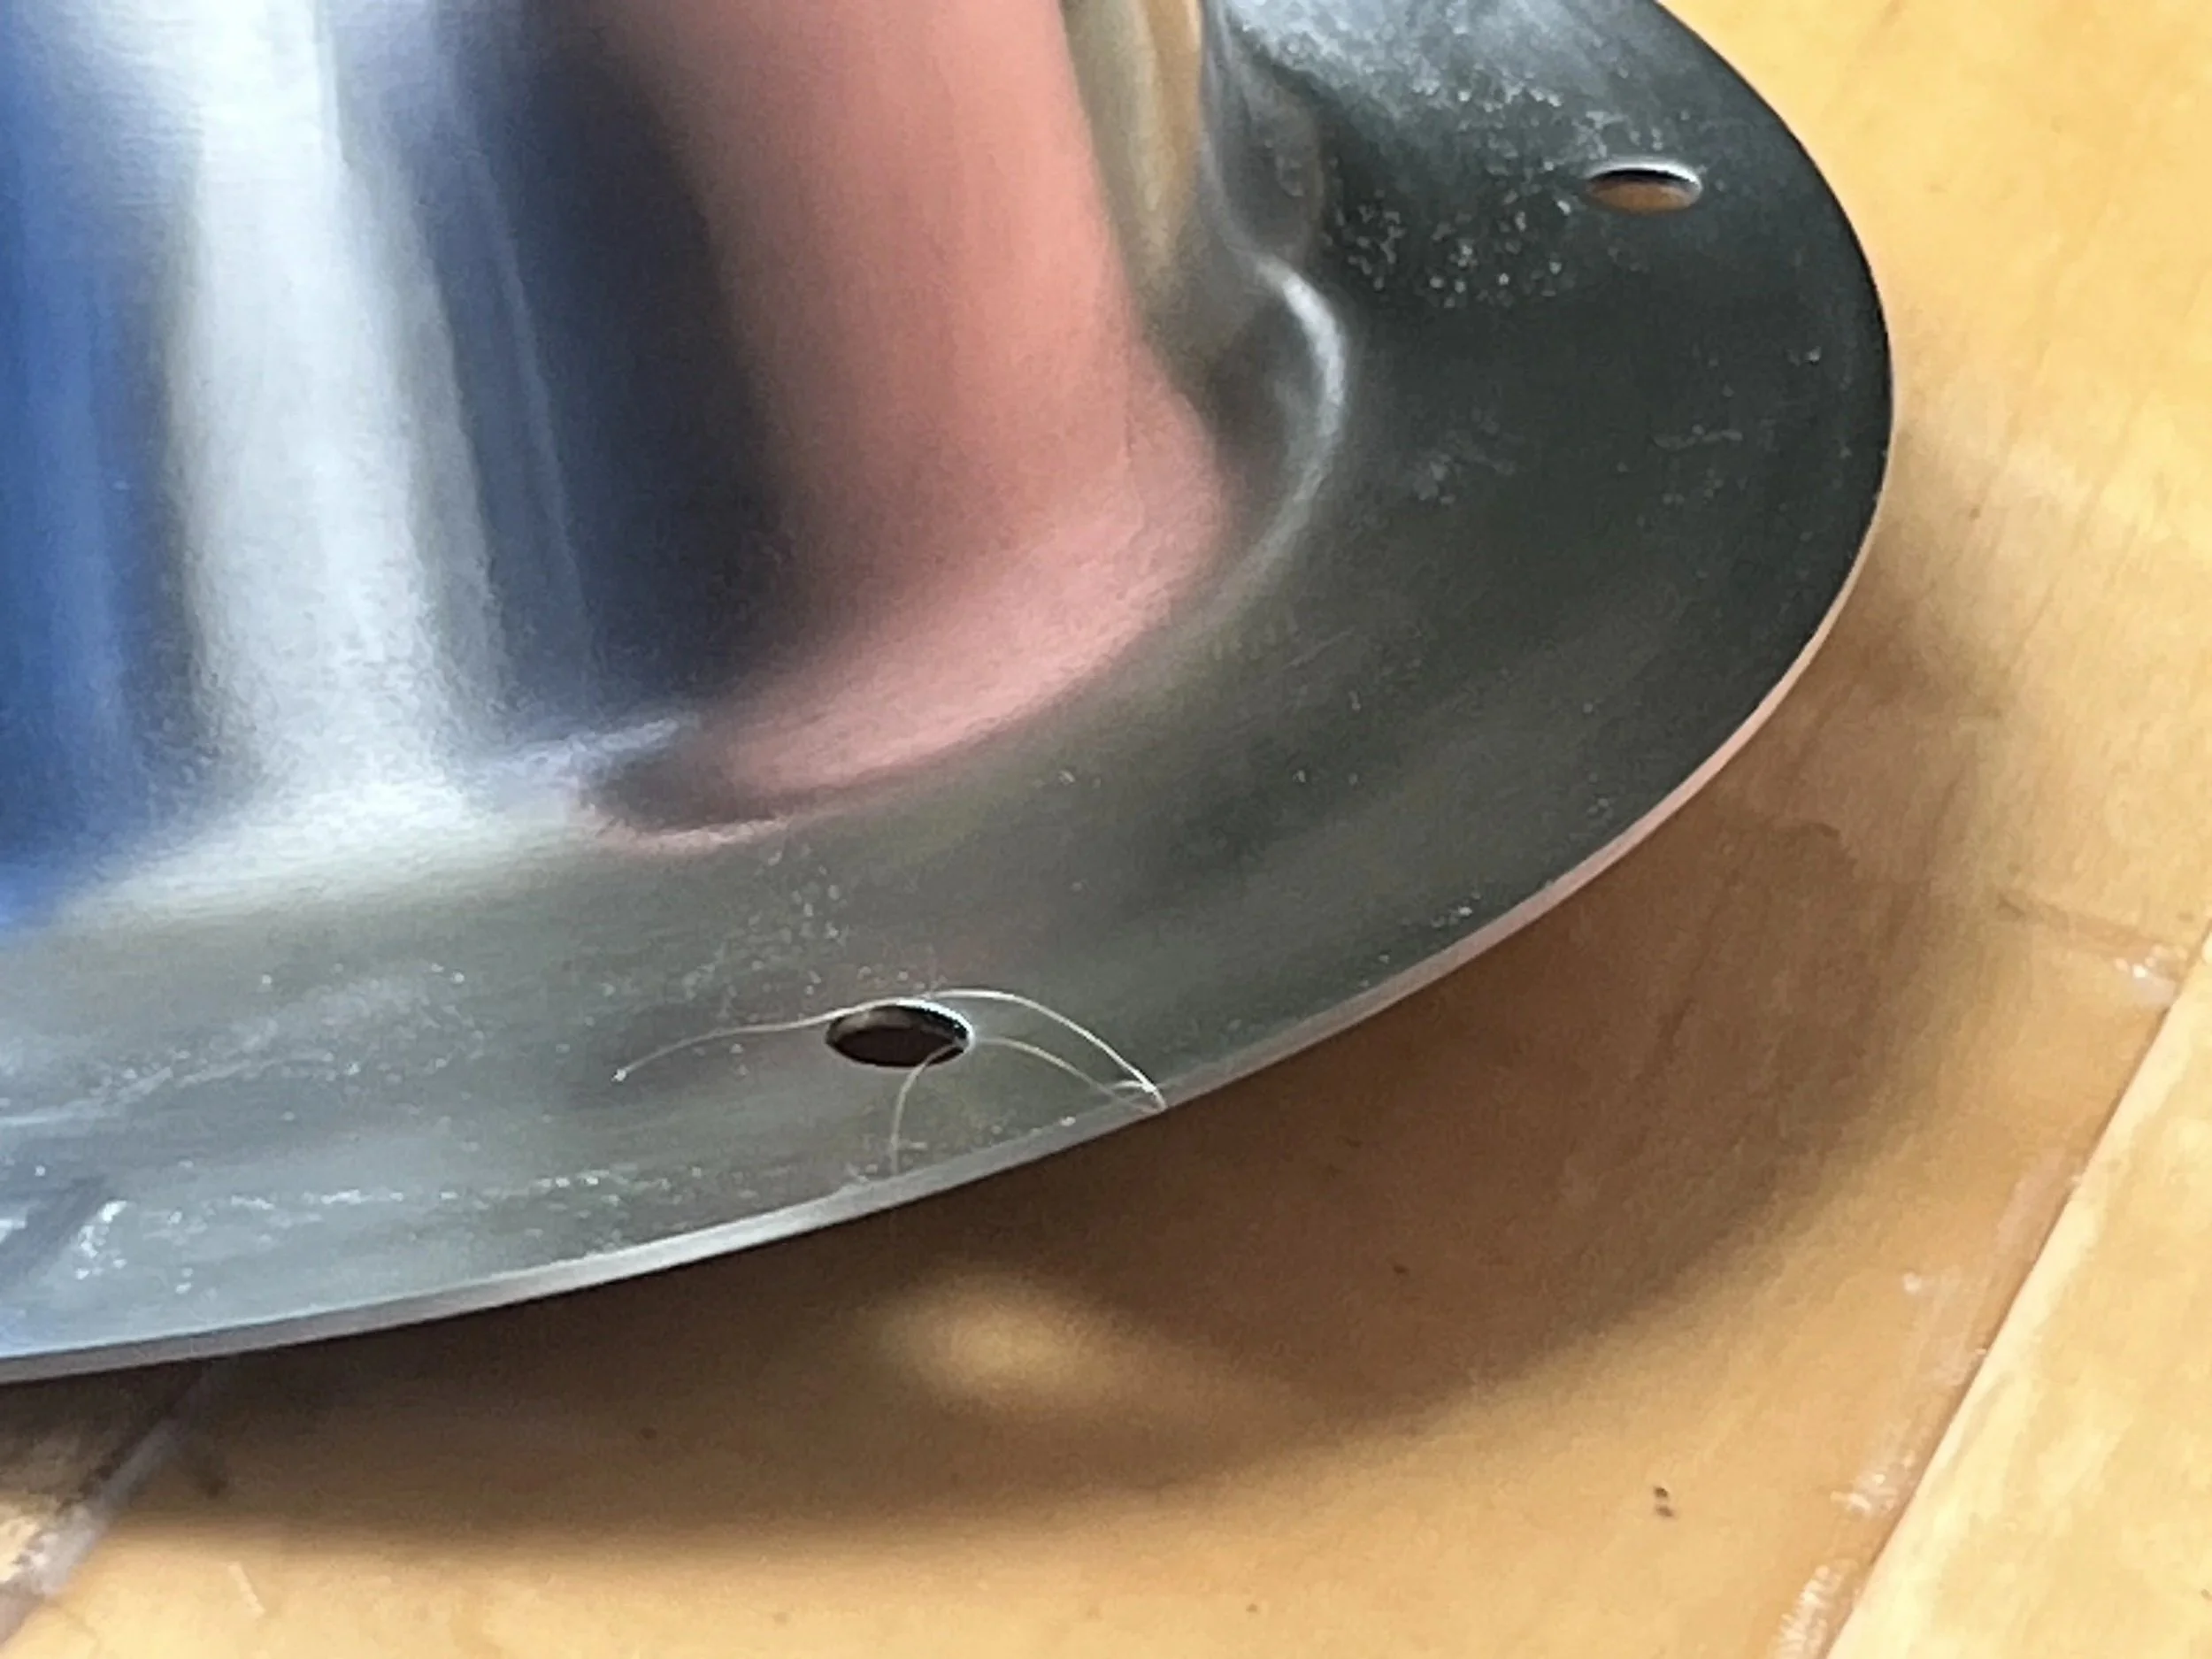
Pictured above – the problem.
The boss was made for a flat shield, and the shield I made was curved. So, I curved the boss. I only have an anvil large enough for riveting. So, taking a ballpein hammer, I placed the lip of the boss over a concrete edge and I bent the edges of the shield boss until it matched the curve of the shield.

I still had to clean away most of the hammer marks, but at least the boss now fits onto the shield.
I feel like I forgot something…. Oh right!
Handle
I have no idea what the handle for these shields looked like in period, so I made something just to work. I got a square polar dowl, about 1.5 in. x 1.5 in. x 3 ft. I cut it to be about 22 inches long. I then also cut away sections at the top and bottom of the dowl so the handle would rest partly on the hole for the shield boss. Finally, I then used a Dremil tool to round out the handle.
Good enough!
Pictured above – dusty science!
Leather
I needed to make a guige strap, and according to The Adoration of the Magi, it needed to be black. I had black leather dye, but I heard about a period leather dye involving iron shavings and vinegar (I need to find the source for this claim). The claim was that the dissolved iron in the vinegar would react with the tannic acid in the leather to turn the leather black. So, I got some steel wool and vinegar.
Long story short, it works… mostly (there were some complications with color consistency). However, the smell is… suitably medieval. It is bitter and acidic to a degree that genuinely caught me off guard, even for vinegar. The work “acrid” comes to mind. But, now I have a fairly inexpensive leather dye… and my apartment smells like eldritch pickles.
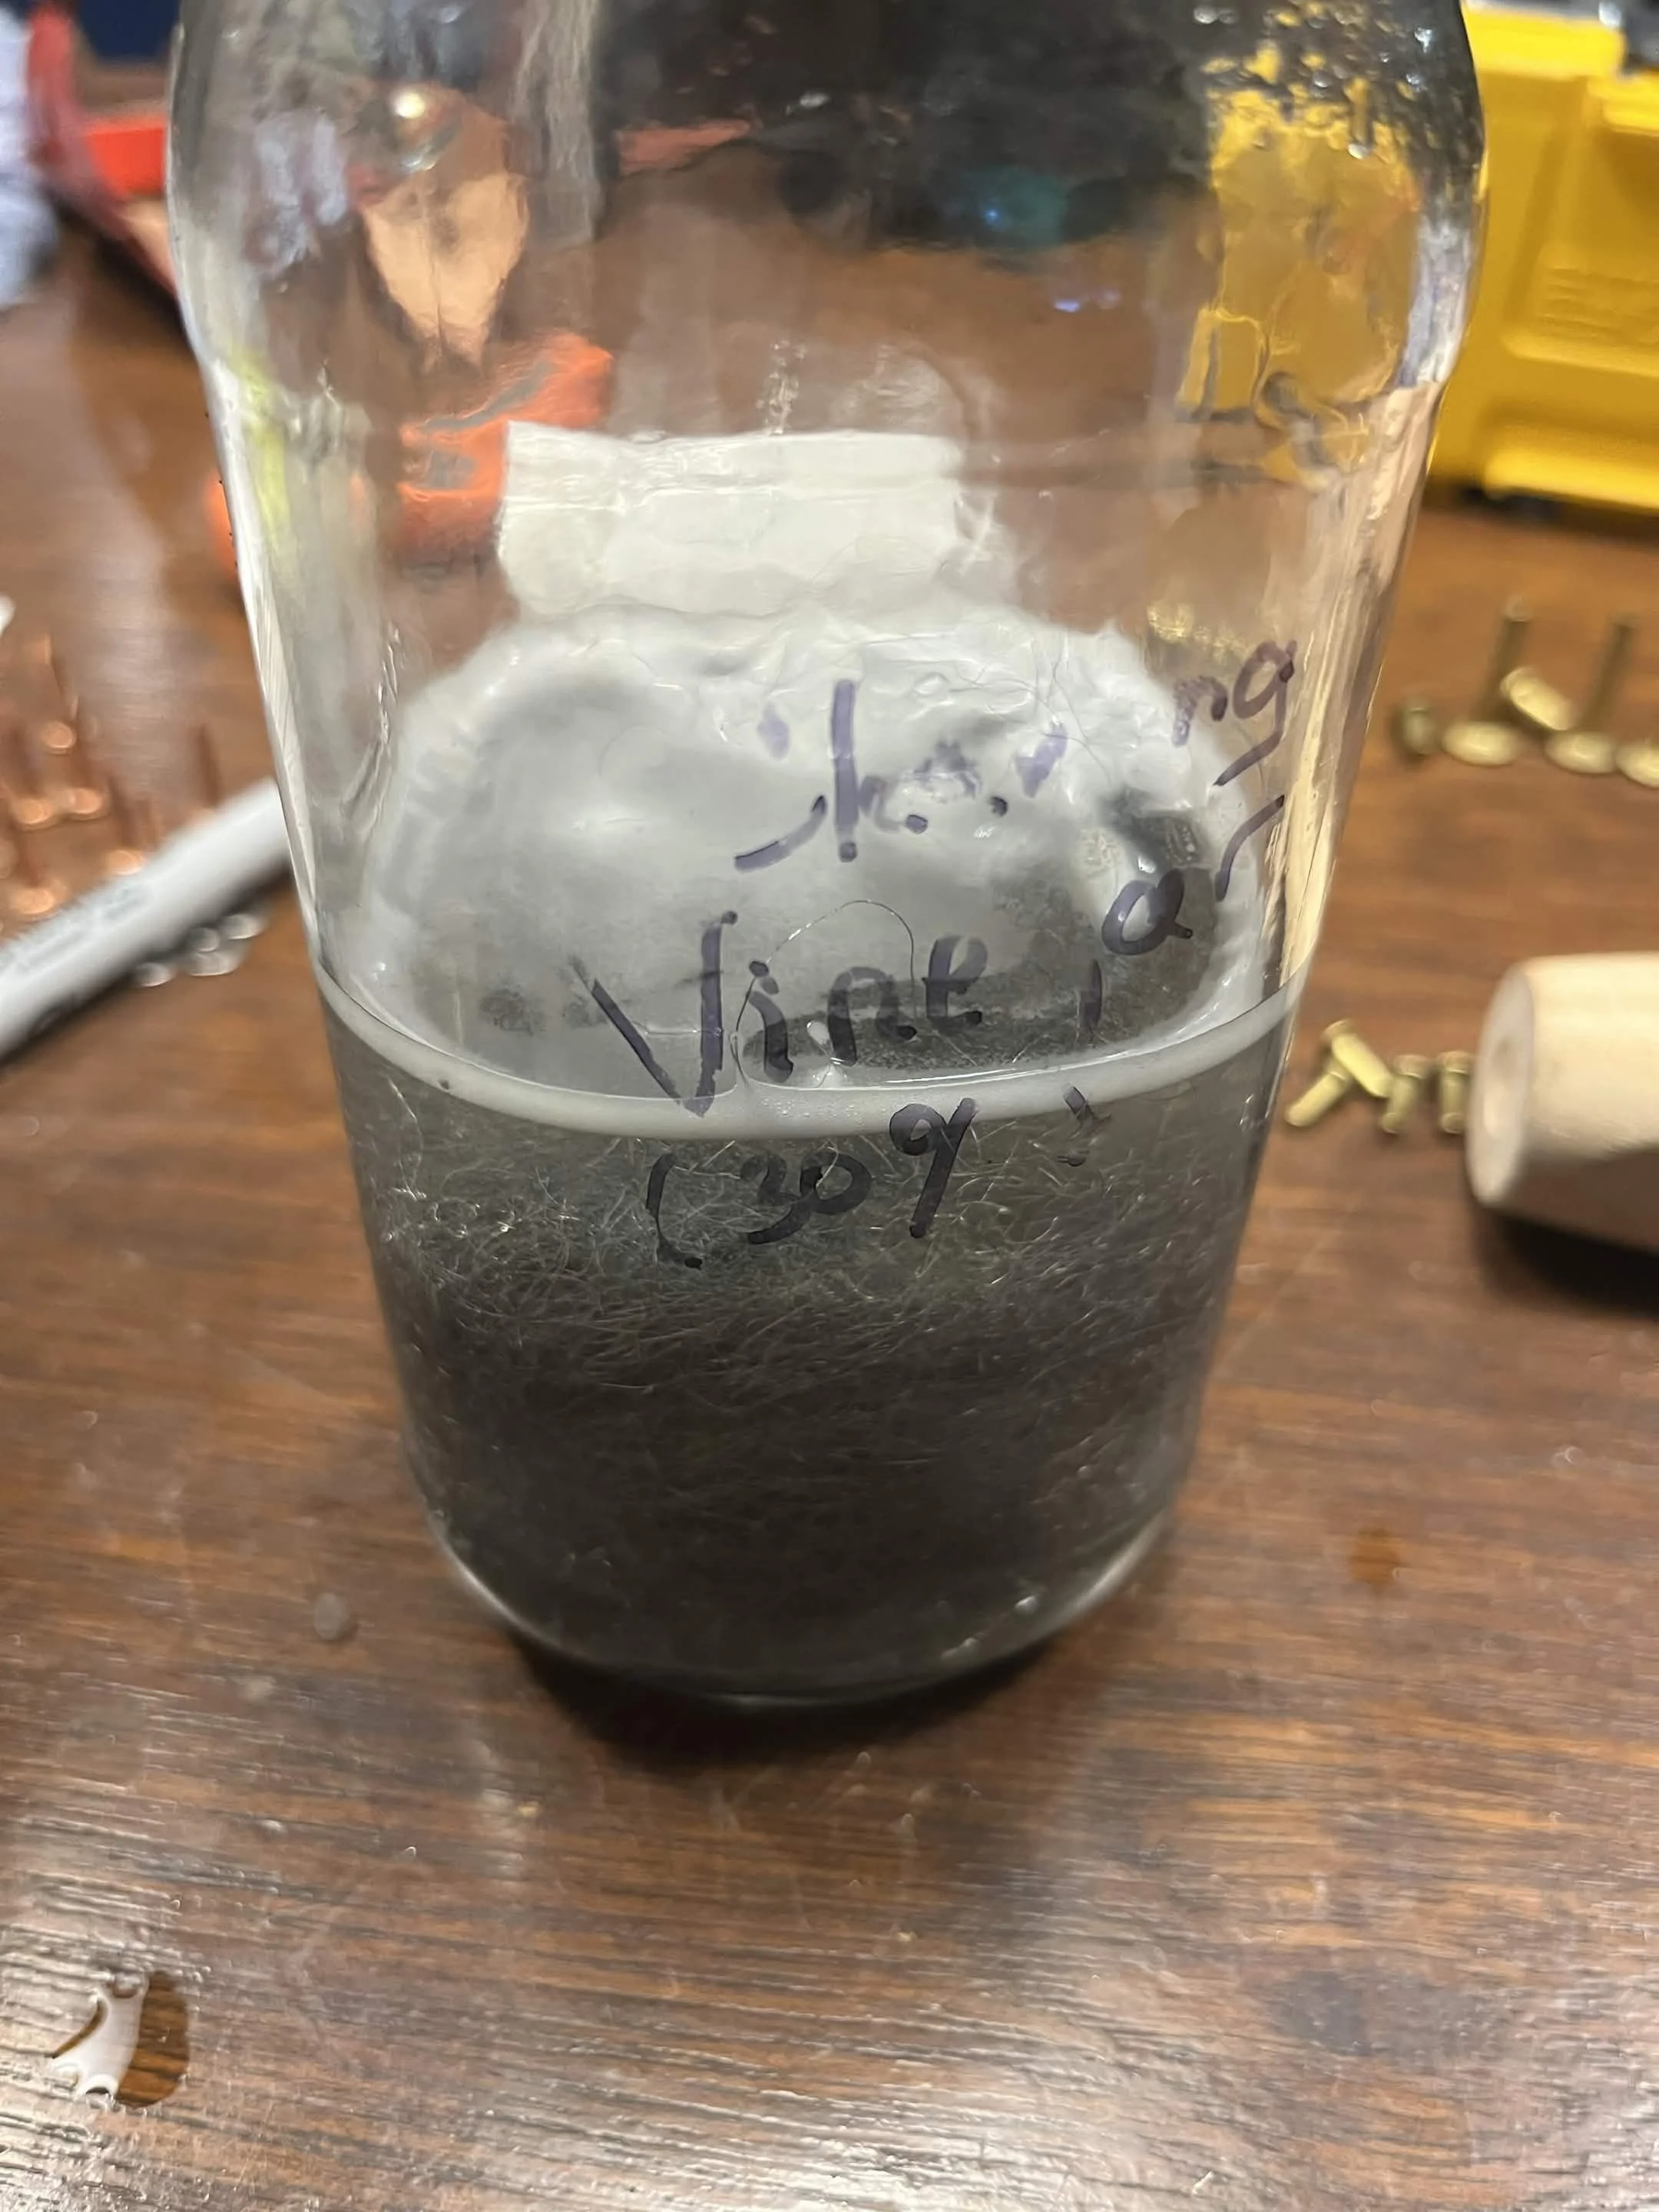
Pictured above - smelly science!
Assembly
I drilled a couple of holes through the rawhide front for the shield. I then matched up those holes to the handle, and drilled a couple of holes into the handle. After that, I took several nails (about 2 inches long) and pushed them through the holes. I placed washers over the nail points, and cut away the excess nail shafts with a Dremil tool. Finally riveting!
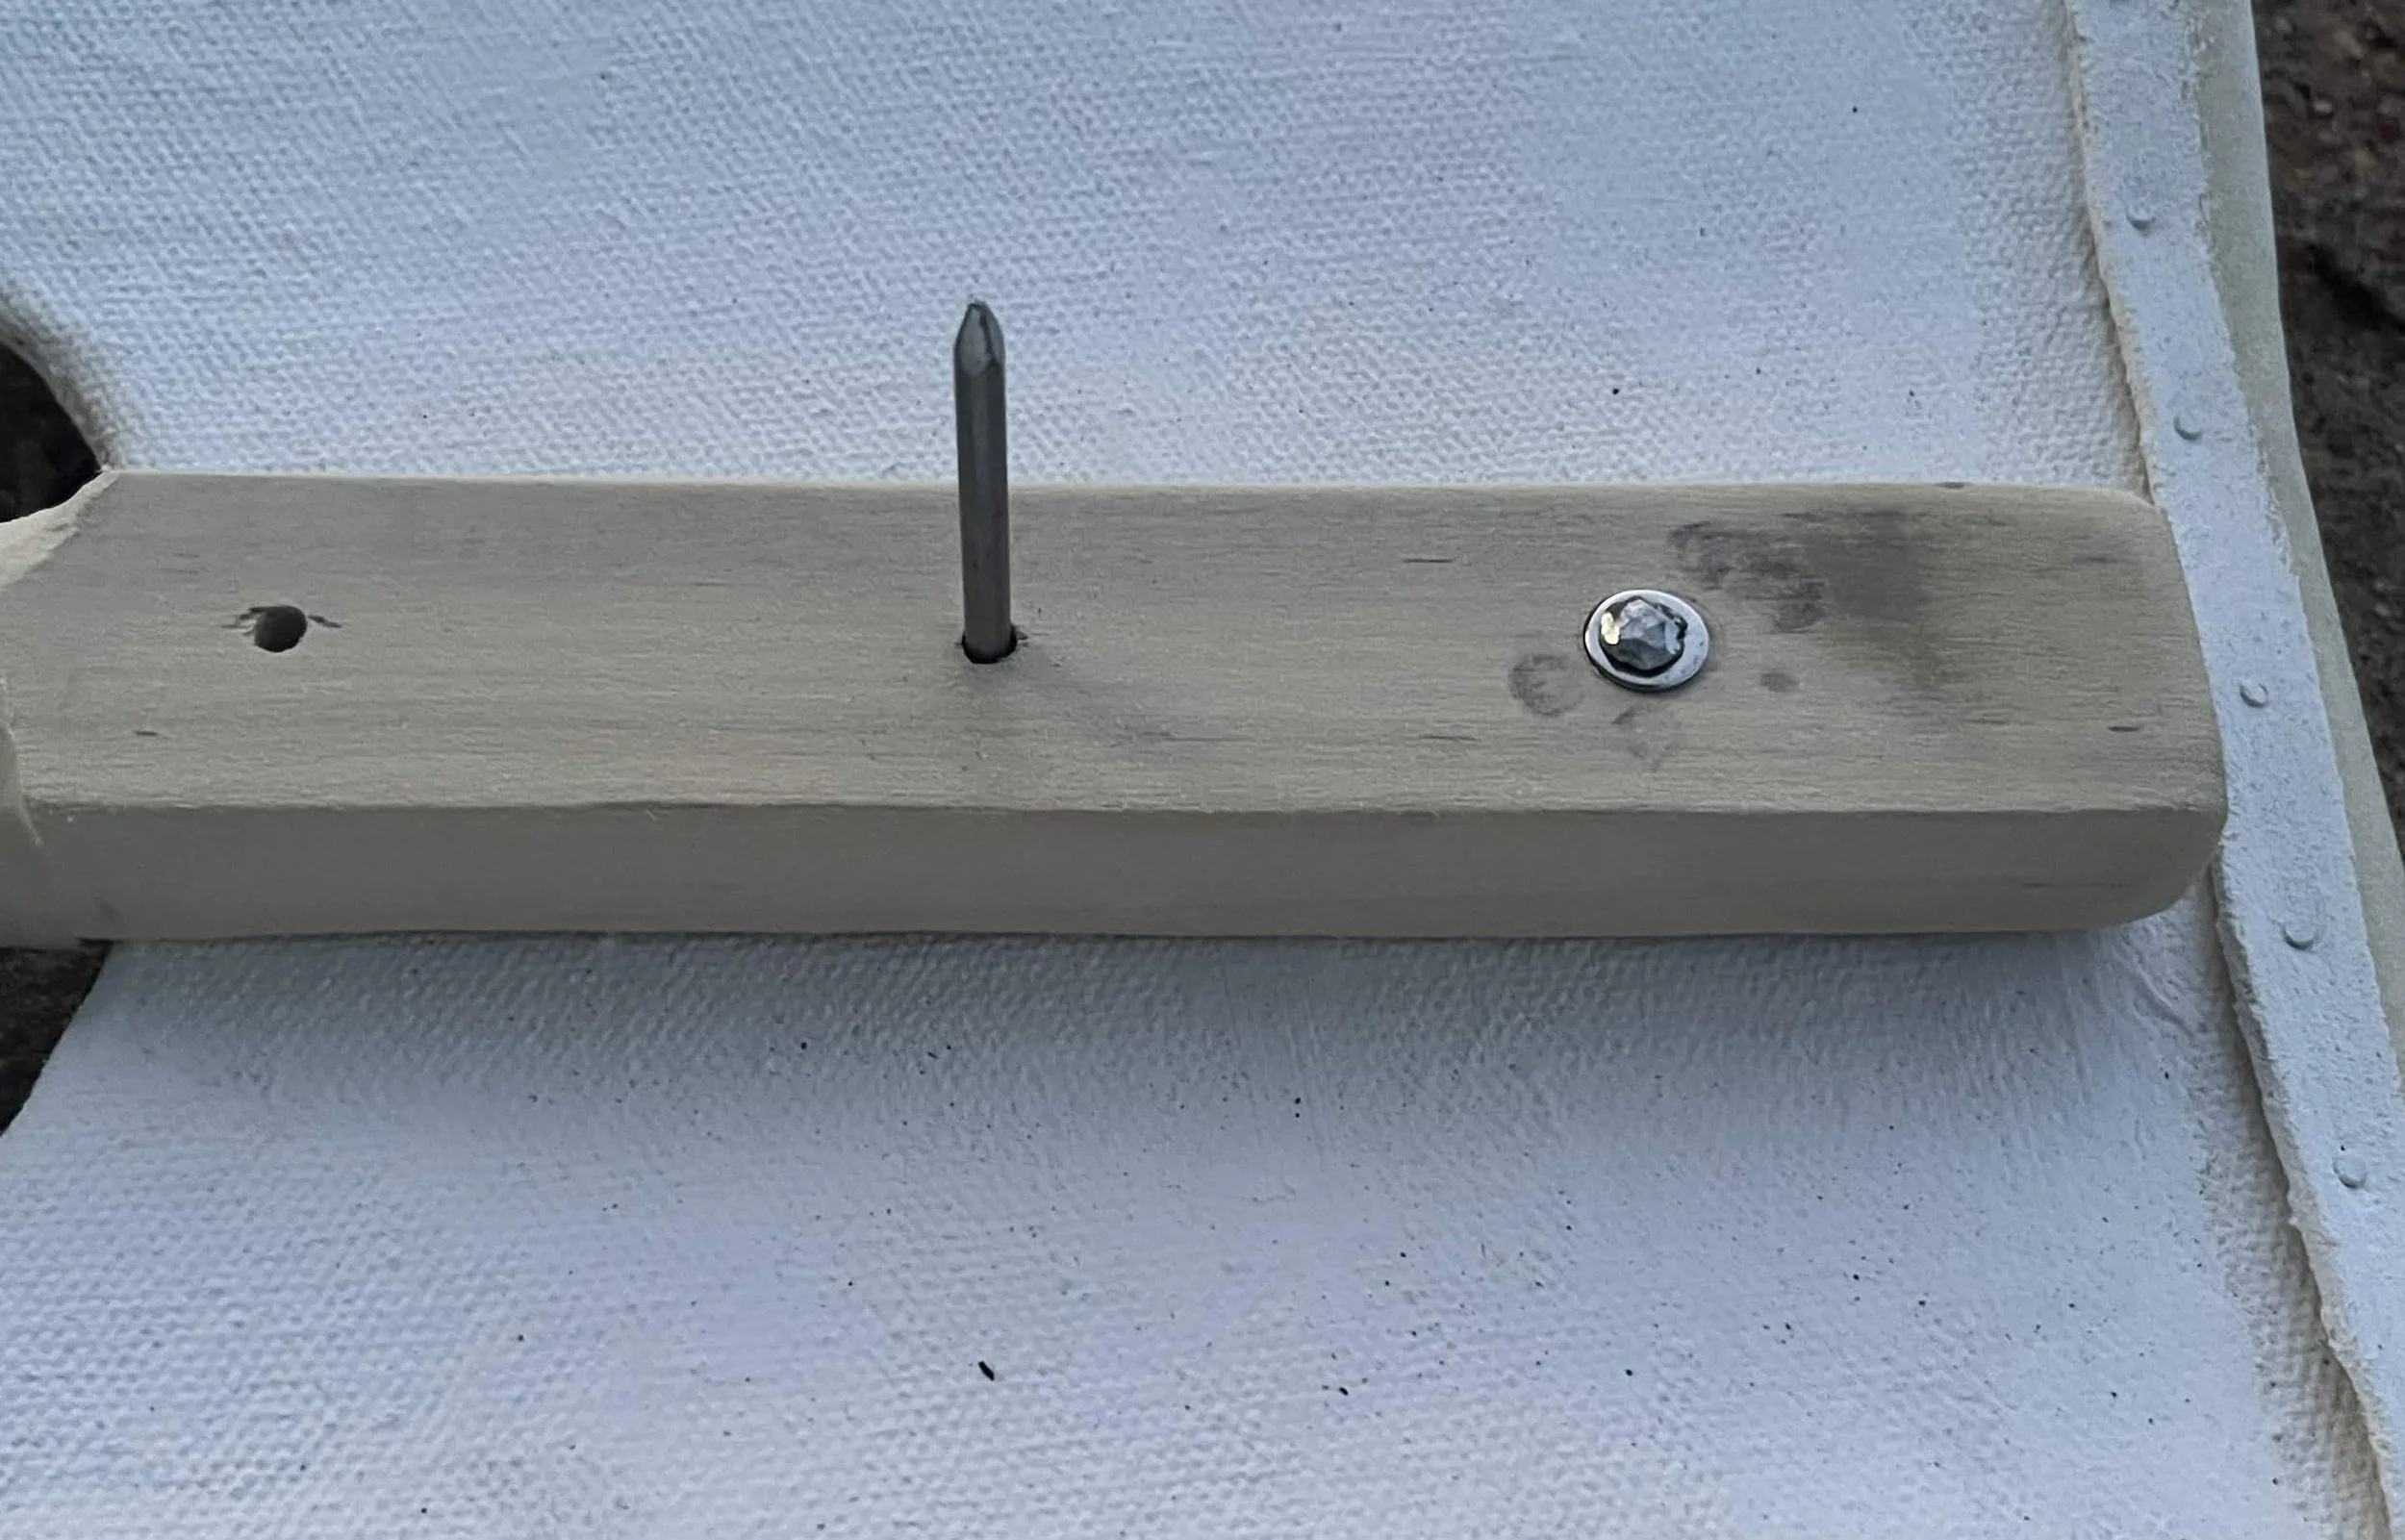
I also riveted on the boss and two brackets for the guige strap.
Paint:
After riveting on the handle and the strap brackets, I could paint the shield. First, there is a base level of gesso (which must make up about 33% of the shield at this point). Then I sanded the gesso to achieve a smoother finish. The Adoration of the Magi shows the shield as yellow, with images of white flowers and green stems that appear to be thorned. So that is what I did. After that, I sewed on the guige straps (with a buckle), punched some holes in the straps, and it should be good to go!
There we have one recreation of a Scottish Guard’s shield for Charles VII of France. At some point I want to try to improve the paint job. I also want to test how arrow resistant it is!